0x00 背景
信息安全工程师没有全栈一说,因为信息安全工程师默认就需要是全栈的。每个人都在往全栈的方向上走,只是走的阶段不同,最终能到达的地方不同而已。
作为默认全栈的21世纪安全工作者,学习下数据、算法的相关知识,当然也是必要的。这篇文章简单总结几个场景和实用工具,来扩充思维,用于日常工作。
0x01 M2环境配置
1
2
3
4
5
6
7
8
9
10
11
12
vi ~/.zprofile eval "$(/opt/homebrew/bin/brew shellenv) " export HOMEBREW_API_DOMAIN ="https://mirrors.tuna.tsinghua.edu.cn/homebrew-bottles/api" export HOMEBREW_BOTTLE_DOMAIN ="https://mirrors.tuna.tsinghua.edu.cn/homebrew-bottles" export HOMEBREW_BREW_GIT_REMOTE ="https://mirrors.tuna.tsinghua.edu.cn/git/homebrew/brew.git" export HOMEBREW_CORE_GIT_REMOTE ="https://mirrors.tuna.tsinghua.edu.cn/git/homebrew/homebrew-core.git" export HOMEBREW_PIP_INDEX_URL ="https://pypi.tuna.tsinghua.edu.cn/simple" export PATH ="/opt/homebrew/opt/openjdk/bin:$PATH "
1 2 3 4 5 6 conda config --show conda config --set auto_activate_base false brew install cmake libomp conda install jupyter notebook
pip源
1
2
3
4
5
(pycaret) ➜ my_code cat ~/.pip/pip.conf [global ] index -url = https://pypi.tuna.tsinghua.edu.cn/simple/[install] trusted -host=pypi.tuna.tsinghua.edu.cn
pycaret
1
2
3
4
5
6
7
8
9
10
# 不支持python 3.11 # 使用python3.9 conda create --name pycaret_py39 python=3.9 conda env list conda activate pycaret_py39 # conda install lightgbm # pip install xgboost pip install pycaret
1
2
3
conda create pip install keras pip install tensorflow-macos
0x02 机器学习-pycaret 1. 攻击检测
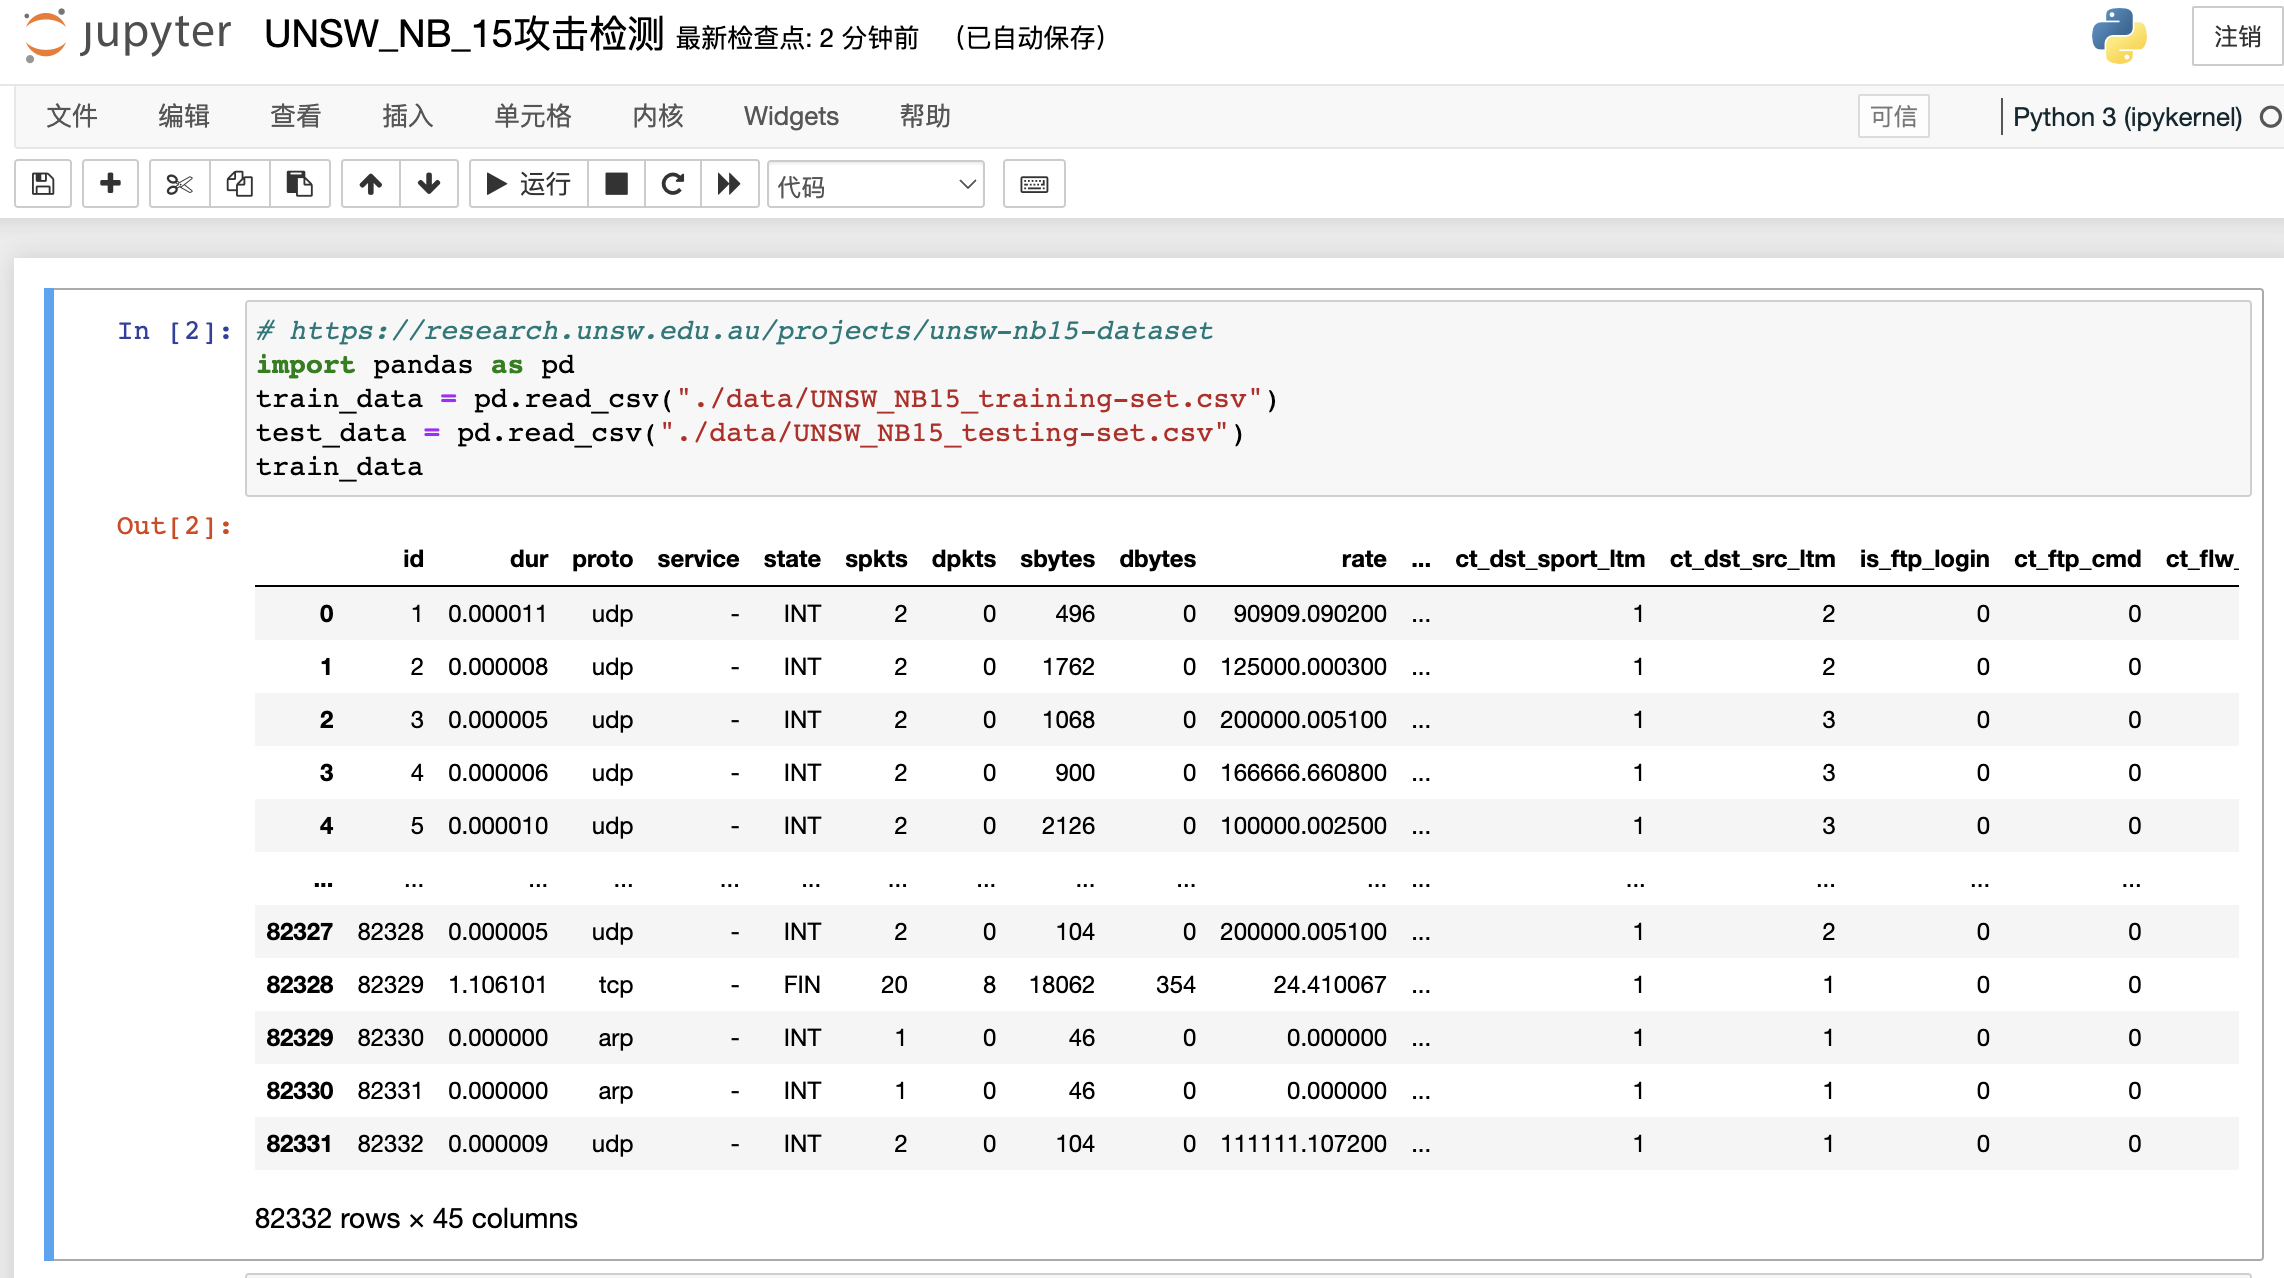
数据集: NSW-NB15 数据集
样本集有42个特征,10个目标分类。本文使用其中的训练集(82332行)和测试集(175341行),来介绍pycaret的使用。样本点击下载 。
数据处理
本文使用attack_cat列来作为目标分类。其余42列作为特征进行训练。
一句话选取最优算法
1
2
3
4
from pycaret.classification import *exp_101 = setup(data = train_data.iloc[:,1 :44 ], target = 'attack_cat' , normalize = True ) best = compare_models()
pycaret会帮你分析特征的类型(连续数字类型/离散枚举类型),这里是39个数据特征、3个离散枚举特征,目标是多分类(10个攻击类别)。
通过训练,本文用的M2芯片(训练途中风扇转数比较快)耗时10分钟左右。选取出了随机森林为最佳算法,准确率87%:
预测测试集
测试集准确率:75%
1 2 3 4 5 6 7 8 9 10 11 12 13 14 15 16 rf = create_model('rf' ) predictions = predict_model(rf, data = test_data.iloc[:,1 :44 ]) predictions print(predictions.shape[0 ]) print(predictions[test_data['attack_cat' ] == predictions['prediction_label' ]].shape[0 ]) print("{:.4}" .format(predictions[test_data['attack_cat' ] == predictions['prediction_label' ]].shape[0 ]/predictions.shape[0 ])) 175341 133160 0.7594
2. 异常行为检测
iforest 孤立森林具体请看 。
1 2 3 4 5 6 7 8 9 10 11 12 13 14 15 16 17 18 radiant_win radiant_score dire_score first_blood_time duration LOSEdeaths_mean LOSEdeaths_std LOSEgold_per_min_mean LOSEgold_per_min_std LOSEhero_damage_mean ... WINkda_mean WINkda_std WINkills_mean WINkills_std WINlast_hits_mean WINlast_hits_std WINlevel_mean WINlevel_std WINxp_per_min_mean WINxp_per_min_std 0 False 25 30 118 3428 6.0 2.549510 403.4 113.076523 23661.2 ... 3.6 1.140175 5.8 3.346640 277.2 223.802815 24.6 0.894427 478.0 24.124676 1 True 27 20 0 3271 5.4 2.302173 423.8 233.012231 18871.0 ... 8.0 9.617692 5.4 3.286335 241.8 282.756432 22.6 2.880972 423.4 106.565942 2 False 16 32 60 2684 6.4 1.341641 363.6 111.869567 9516.4 ... 6.2 3.492850 6.4 2.966479 202.6 183.580500 21.8 3.271085 482.6 141.288004 3 True 27 14 191 2195 5.4 2.073644 336.6 157.931314 8735.6 ... 8.4 7.569676 5.2 4.207137 150.4 115.331262 20.2 3.420526 515.8 150.013999 4 False 13 38 7 2155 7.6 1.140175 317.8 158.759882 7140.4 ... 7.4 1.816590 7.6 3.847077 149.8 78.836540 21.2 1.483240 559.8 81.533429 ... ... ... ... ... ... ... ... ... ... ... ... ... ... ... ... ... ... ... ... ... ... 95 True 36 35 171 2899 7.8 1.643168 407.4 103.500242 19487.2 ... 3.4 2.701851 7.0 3.674235 186.8 92.758827 23.4 1.341641 515.6 69.089073 96 False 22 29 162 1976 5.8 1.303840 385.4 134.247160 10605.8 ... 2.8 1.643168 5.6 3.911521 172.4 132.057942 19.8 3.114482 542.4 164.357233 97 True 68 40 63 2865 13.8 3.834058 397.2 77.114849 28071.6 ... 4.4 1.140175 13.6 6.188699 152.8 89.812026 24.8 0.447214 576.8 17.455658 98 True 37 36 30 2218 7.4 2.607681 397.2 92.968812 19278.6 ... 2.4 1.140175 6.8 3.768289 156.4 116.427230 21.8 3.271085 594.0 162.556144 99 True 56 60 50 3329 11.2 2.588436 455.6 157.053494 39042.6 ... 2.6 1.816590 11.0 9.354143 188.2 104.609751 24.8 0.447214 500.4 10.382678 100 rows × 37 columnsimport numpy as npdataArray = np.array(games_plus.dropna().astype(np.float32))
一句话生成算法:
1
2
3
4
from pycaret.anomaly import *anomaly_pycaret = setup(games_plus.dropna().astype(np.float32)) iforest = create_model('iforest' , n_estimators=1000 , max_features=len(games_plus.columns))
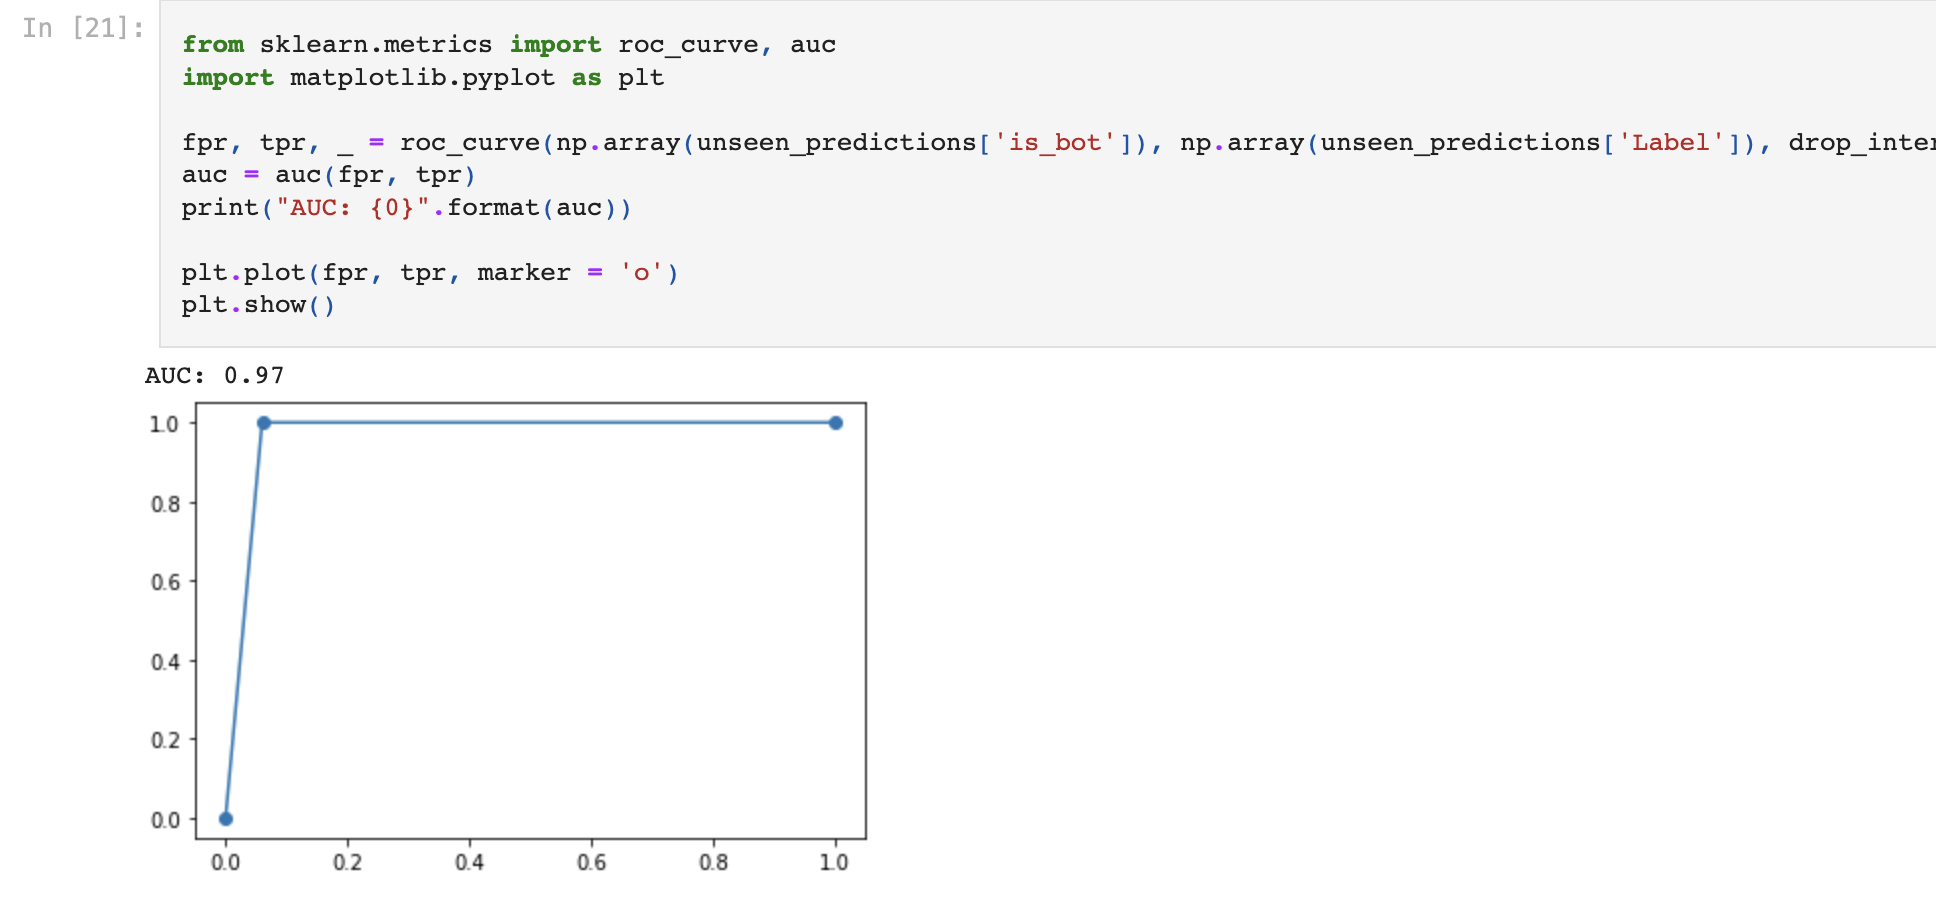
运行计算评估:
1
2
3
4
5
6
7
8
9
10
11
12
13
14
15
iforest IForest(behaviour='new' , bootstrap=False , contamination=0.05 , max_features=37 , max_samples='auto' , n_estimators=1000 , n_jobs=1 , random_state=1148 , verbose=0 ) unseen_predictions = predict_model(iforest, data=test_set) unseen_predictions.to_csv('data/result.csv' ) from sklearn.metrics import roc_curve, aucimport matplotlib.pyplot as pltfpr, tpr, _ = roc_curve(np.array(unseen_predictions['is_bot' ]), np.array(unseen_predictions['Label' ]), drop_intermediate = False ) auc = auc(fpr, tpr) print("AUC: {0}" .format(auc)) plt.plot(fpr, tpr, marker = 'o' ) plt.show()
数据集:国际航空12年(1949-1960)乘客数
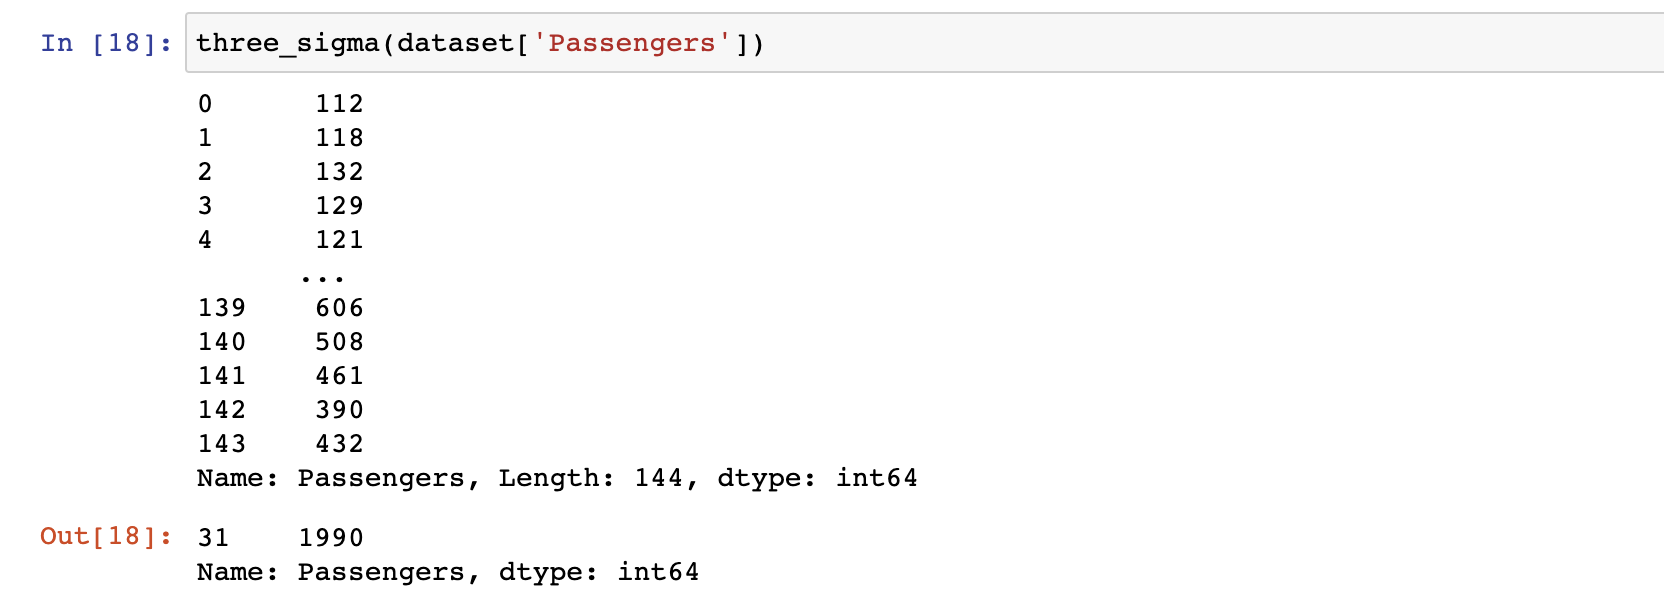
假设数据集是服从正态分布,数据落在“数学期望+-3倍方差” 范围外就是异常点。
1 2 3 4 5 6 7 8 9 def three_sigma (df_col) : """ df_col:DataFrame数据的某一列 """ rule = (df_col.mean() - 3 * df_col.std() > df_col) | (df_col.mean() + 3 * df_col.std() < df_col) index = np.arange(df_col.shape[0 ])[rule] outrange = df_col.iloc[index] return outrange
本文将第33行数据”1951-08,1990”改成“1951-08,19900”,构造成1个异常点。
隐式/马尔可夫链(ToDo
账号行为分析层面,基于概率学(前后关联)的算法。
0x03 深度学习-keras 1. 异常行为分析 数据集同样使用:国际航空12年(1949-1960)乘客数
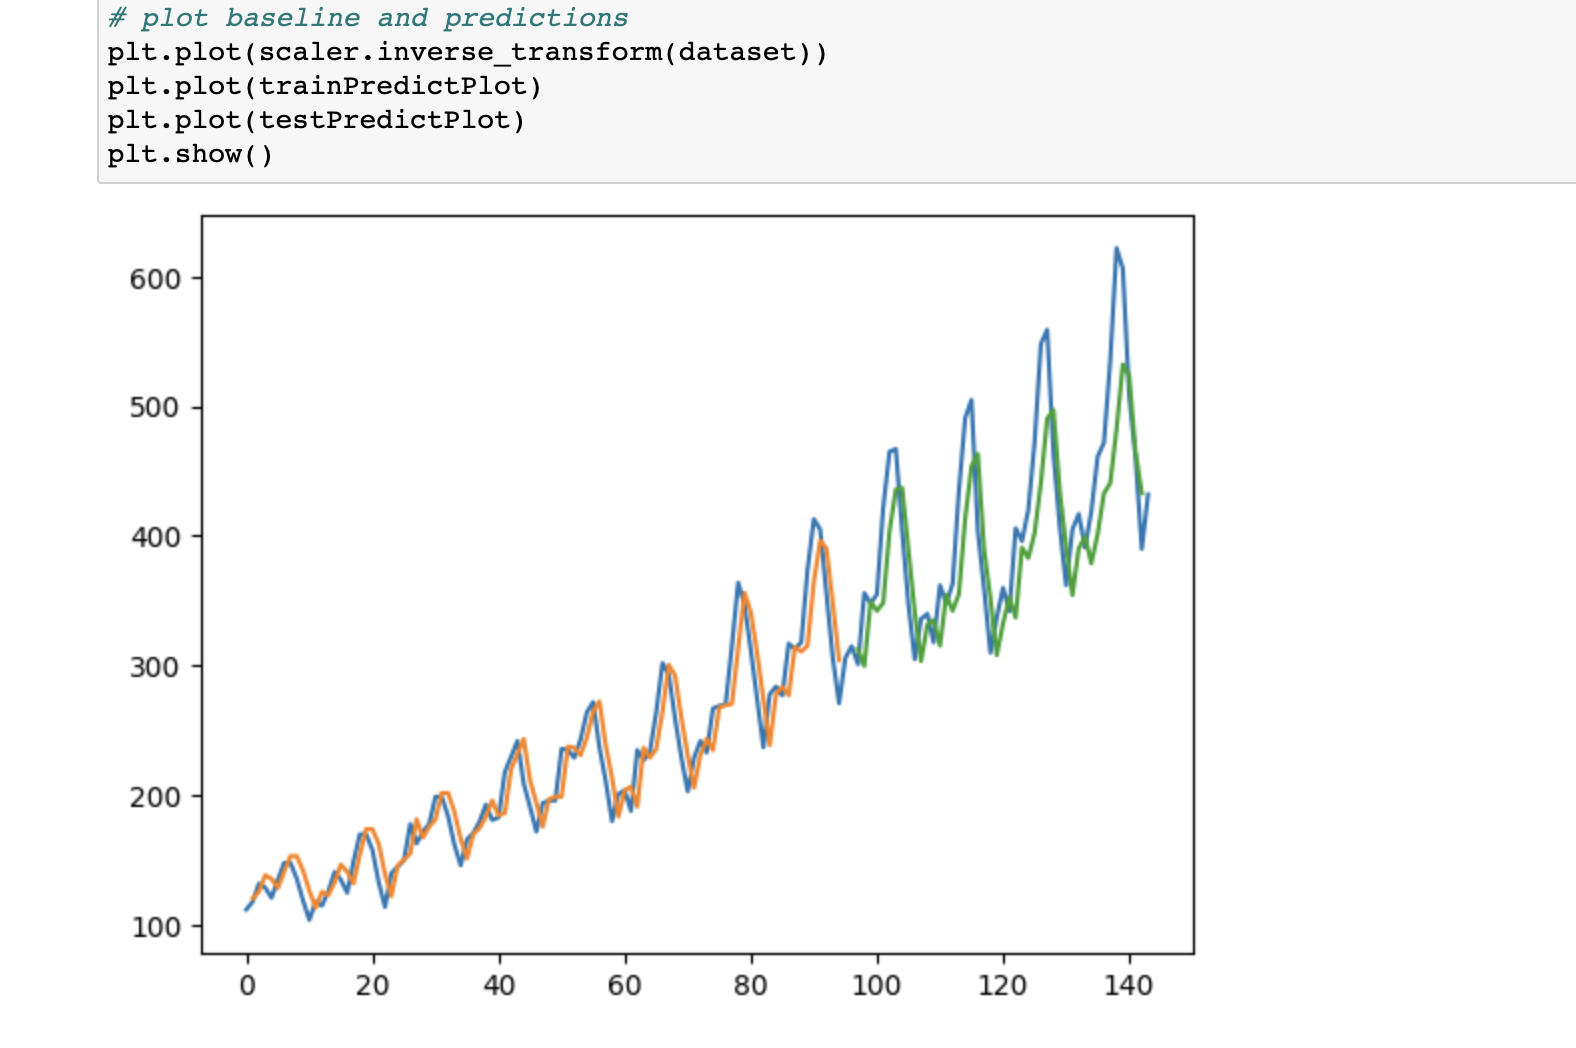
长短期记忆网络 (LSTM 网络)是一种使用时间反向传播训练的循环神经网络,克服了梯度消失问题。当数据有“时序前后关联”时,尝试建立LSTM模型去预测。
1 2 3 4 5 6 7 8 9 10 11 12 13 14 15 def create_dataset (dataset, look_back=1 ) : dataX, dataY = [], [] for i in range(len(dataset)-look_back-1 ): a = dataset[i:(i+look_back), 0 ] dataX.append(a) dataY.append(dataset[i + look_back, 0 ]) return np.array(dataX), np.array(dataY) model = Sequential() model.add(LSTM(4 , input_shape=(1 , look_back))) model.add(Dense(1 )) model.compile(loss='mean_squared_error' , optimizer='adam' ) model.fit(trainX, trainY, epochs=100 , batch_size=1 , verbose=2 )
训练模型很快,比较预测值和实际值,看到趋势预测很精准,图像如下:
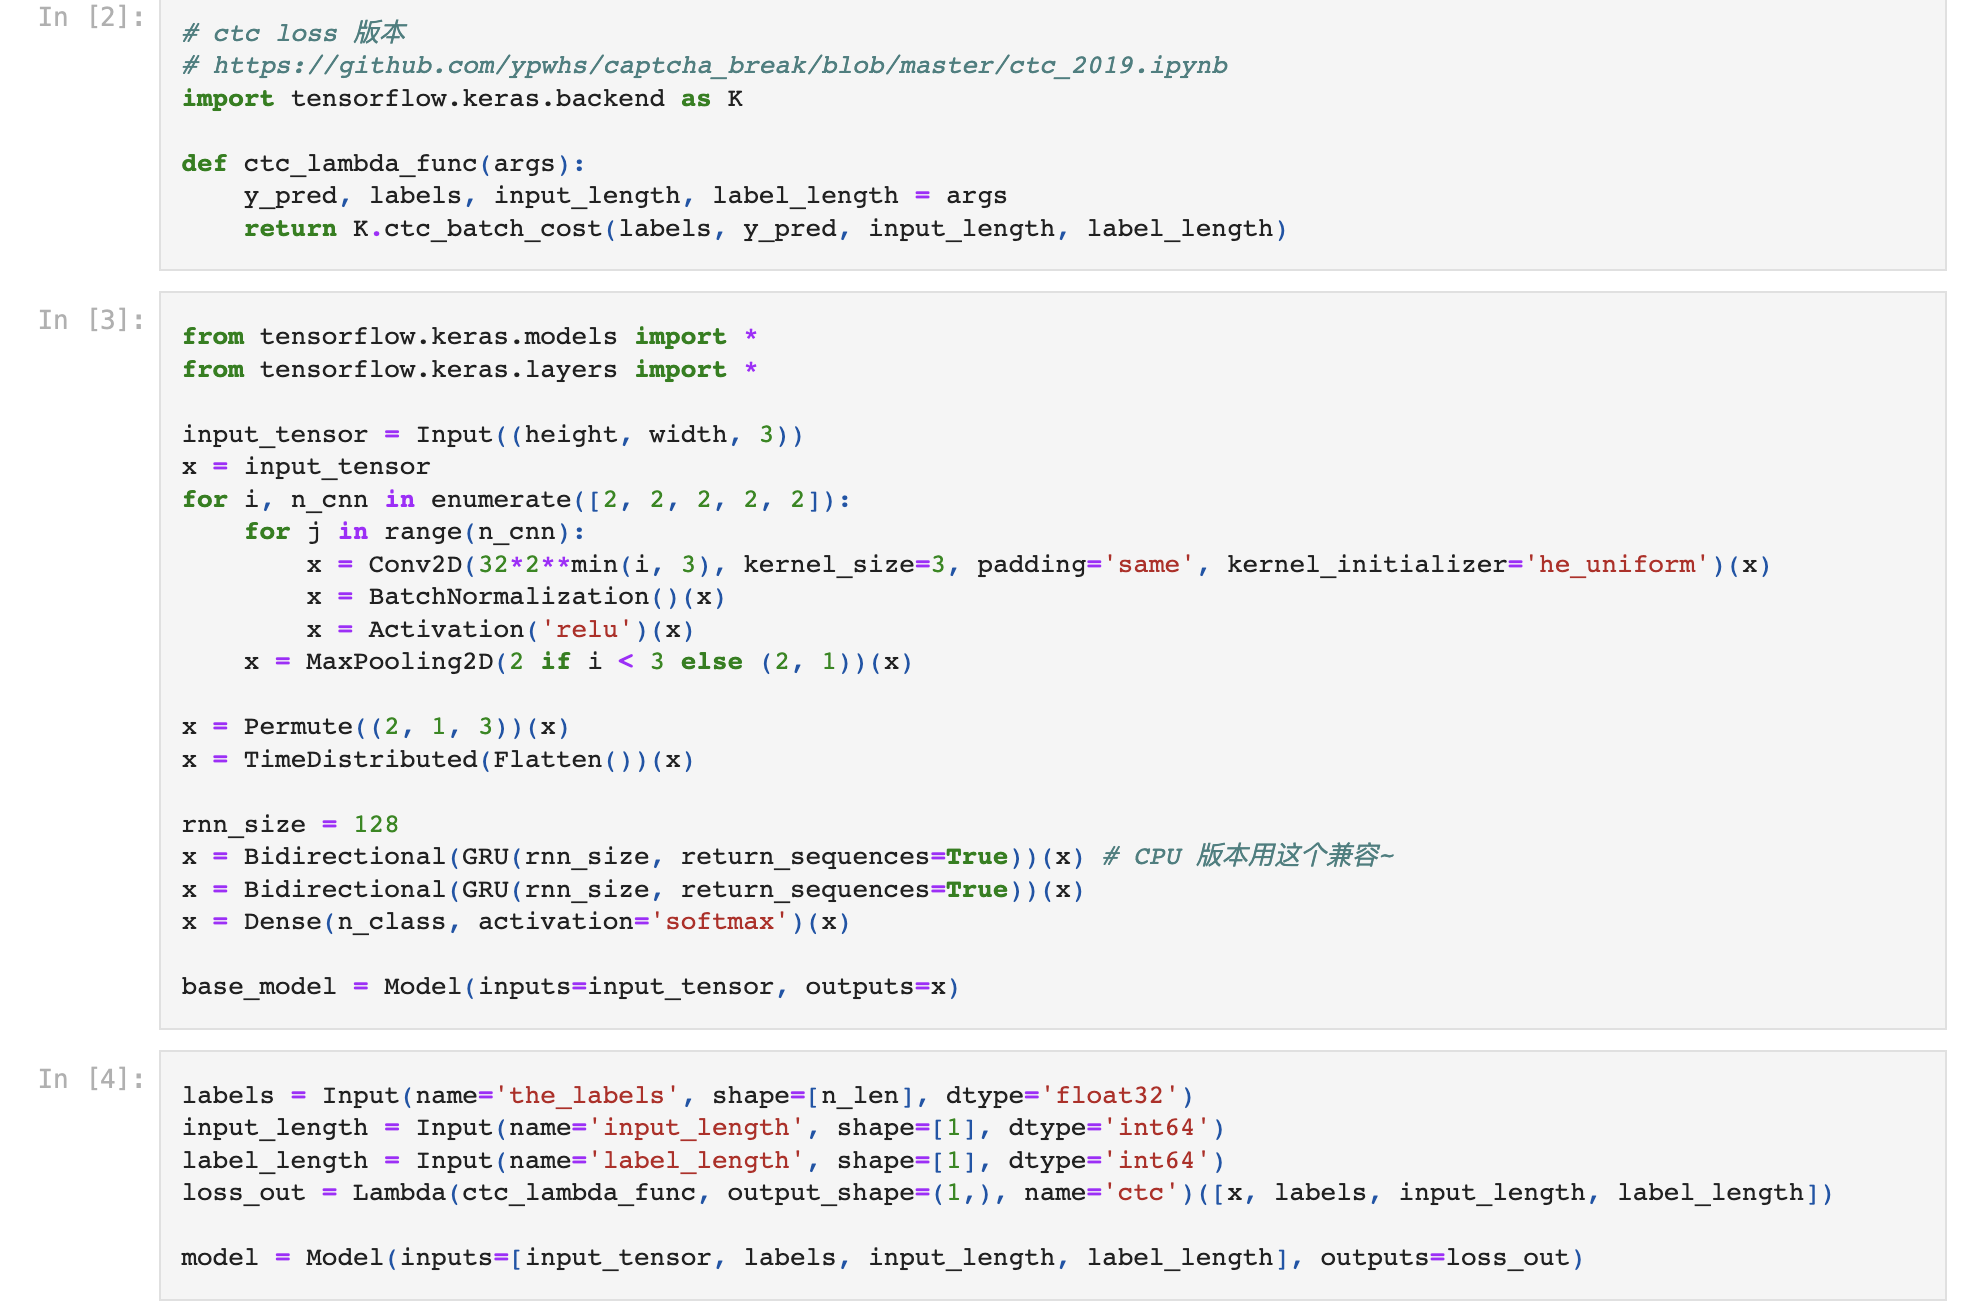
2. 验证码破解
原理参考:Github高赞
数据收集:先打码平台收集正确样本2W,发现整体准确率<80%,通过模型训练可以提升到99%。
1 2 3 4 5 6 7 8 9 10 11 12 from tensorflow.keras.callbacks import EarlyStopping, CSVLogger, ModelCheckpointfrom tensorflow.keras.optimizers import *train_data = MyDataset(characters, batch_size=128 ) valid_data = MyDataset(characters, batch_size=128 ,train=False ) callbacks = [EarlyStopping(patience=5 ), Evaluate(), CSVLogger('ctc.csv' ), ModelCheckpoint('ctc_best.h5' , save_best_only=True )] model.compile(loss={'ctc' : lambda y_true, y_pred: y_pred}, optimizer=Adam(1e-3 , amsgrad=True )) model.fit_generator(train_data, epochs=100 , validation_data=valid_data, workers=4 , use_multiprocessing=True , callbacks=callbacks)
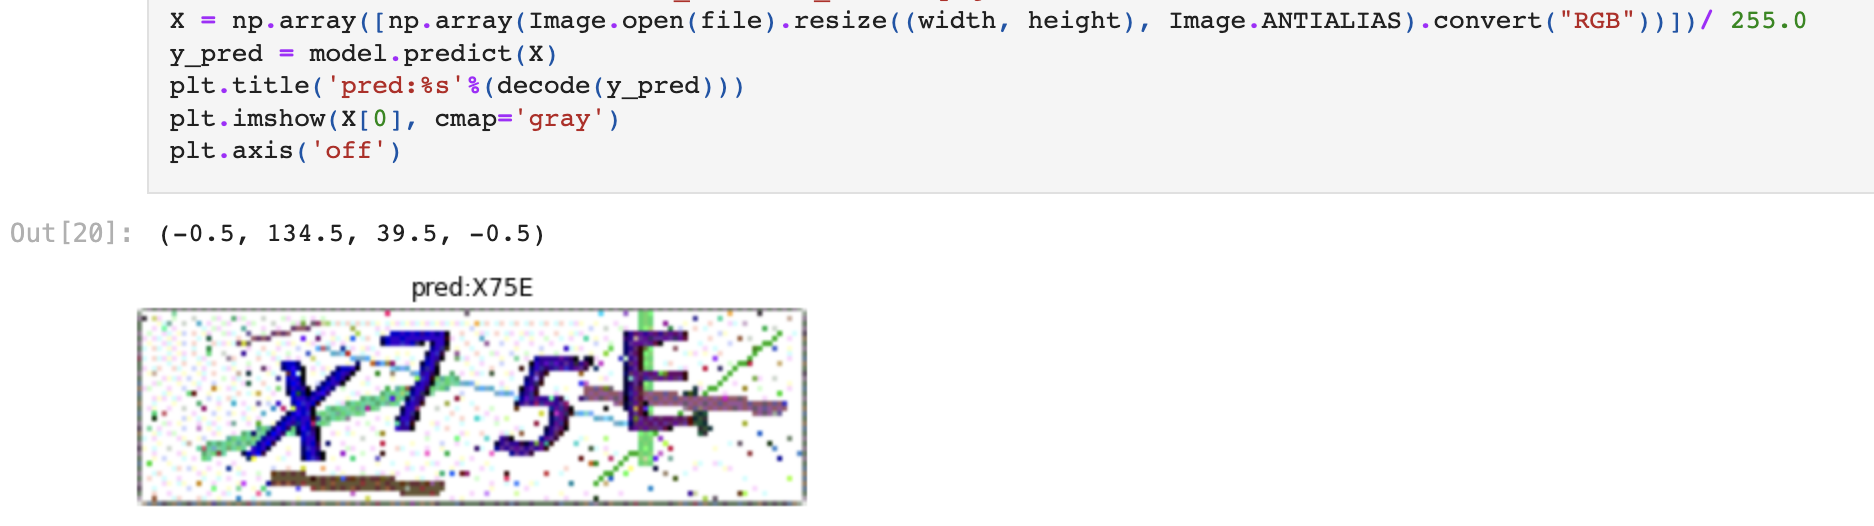
训练大概需要1个小时,需要使用的时候加载即可:
1 2 3 4 5 6 7 8 9 10 11 12 13 model.save('check_code_20210201_star_2.h5' ) def decode (y) : y = np.argmax(np.array(y), axis=2 )[:,0 ] return '' .join([characters[x] for x in y]) file = './验证码样本/x75e.png' X = np.array([np.array(Image.open(file).resize((width, height), Image.ANTIALIAS).convert("RGB" ))])/ 255.0 y_pred = model.predict(X) plt.title('pred:%s' %(decode(y_pred))) plt.imshow(X[0 ], cmap='gray' ) plt.axis('off' )
0x04 开源模型社区资源 国内外有社区发布开源模型,有需求可以直接使用。
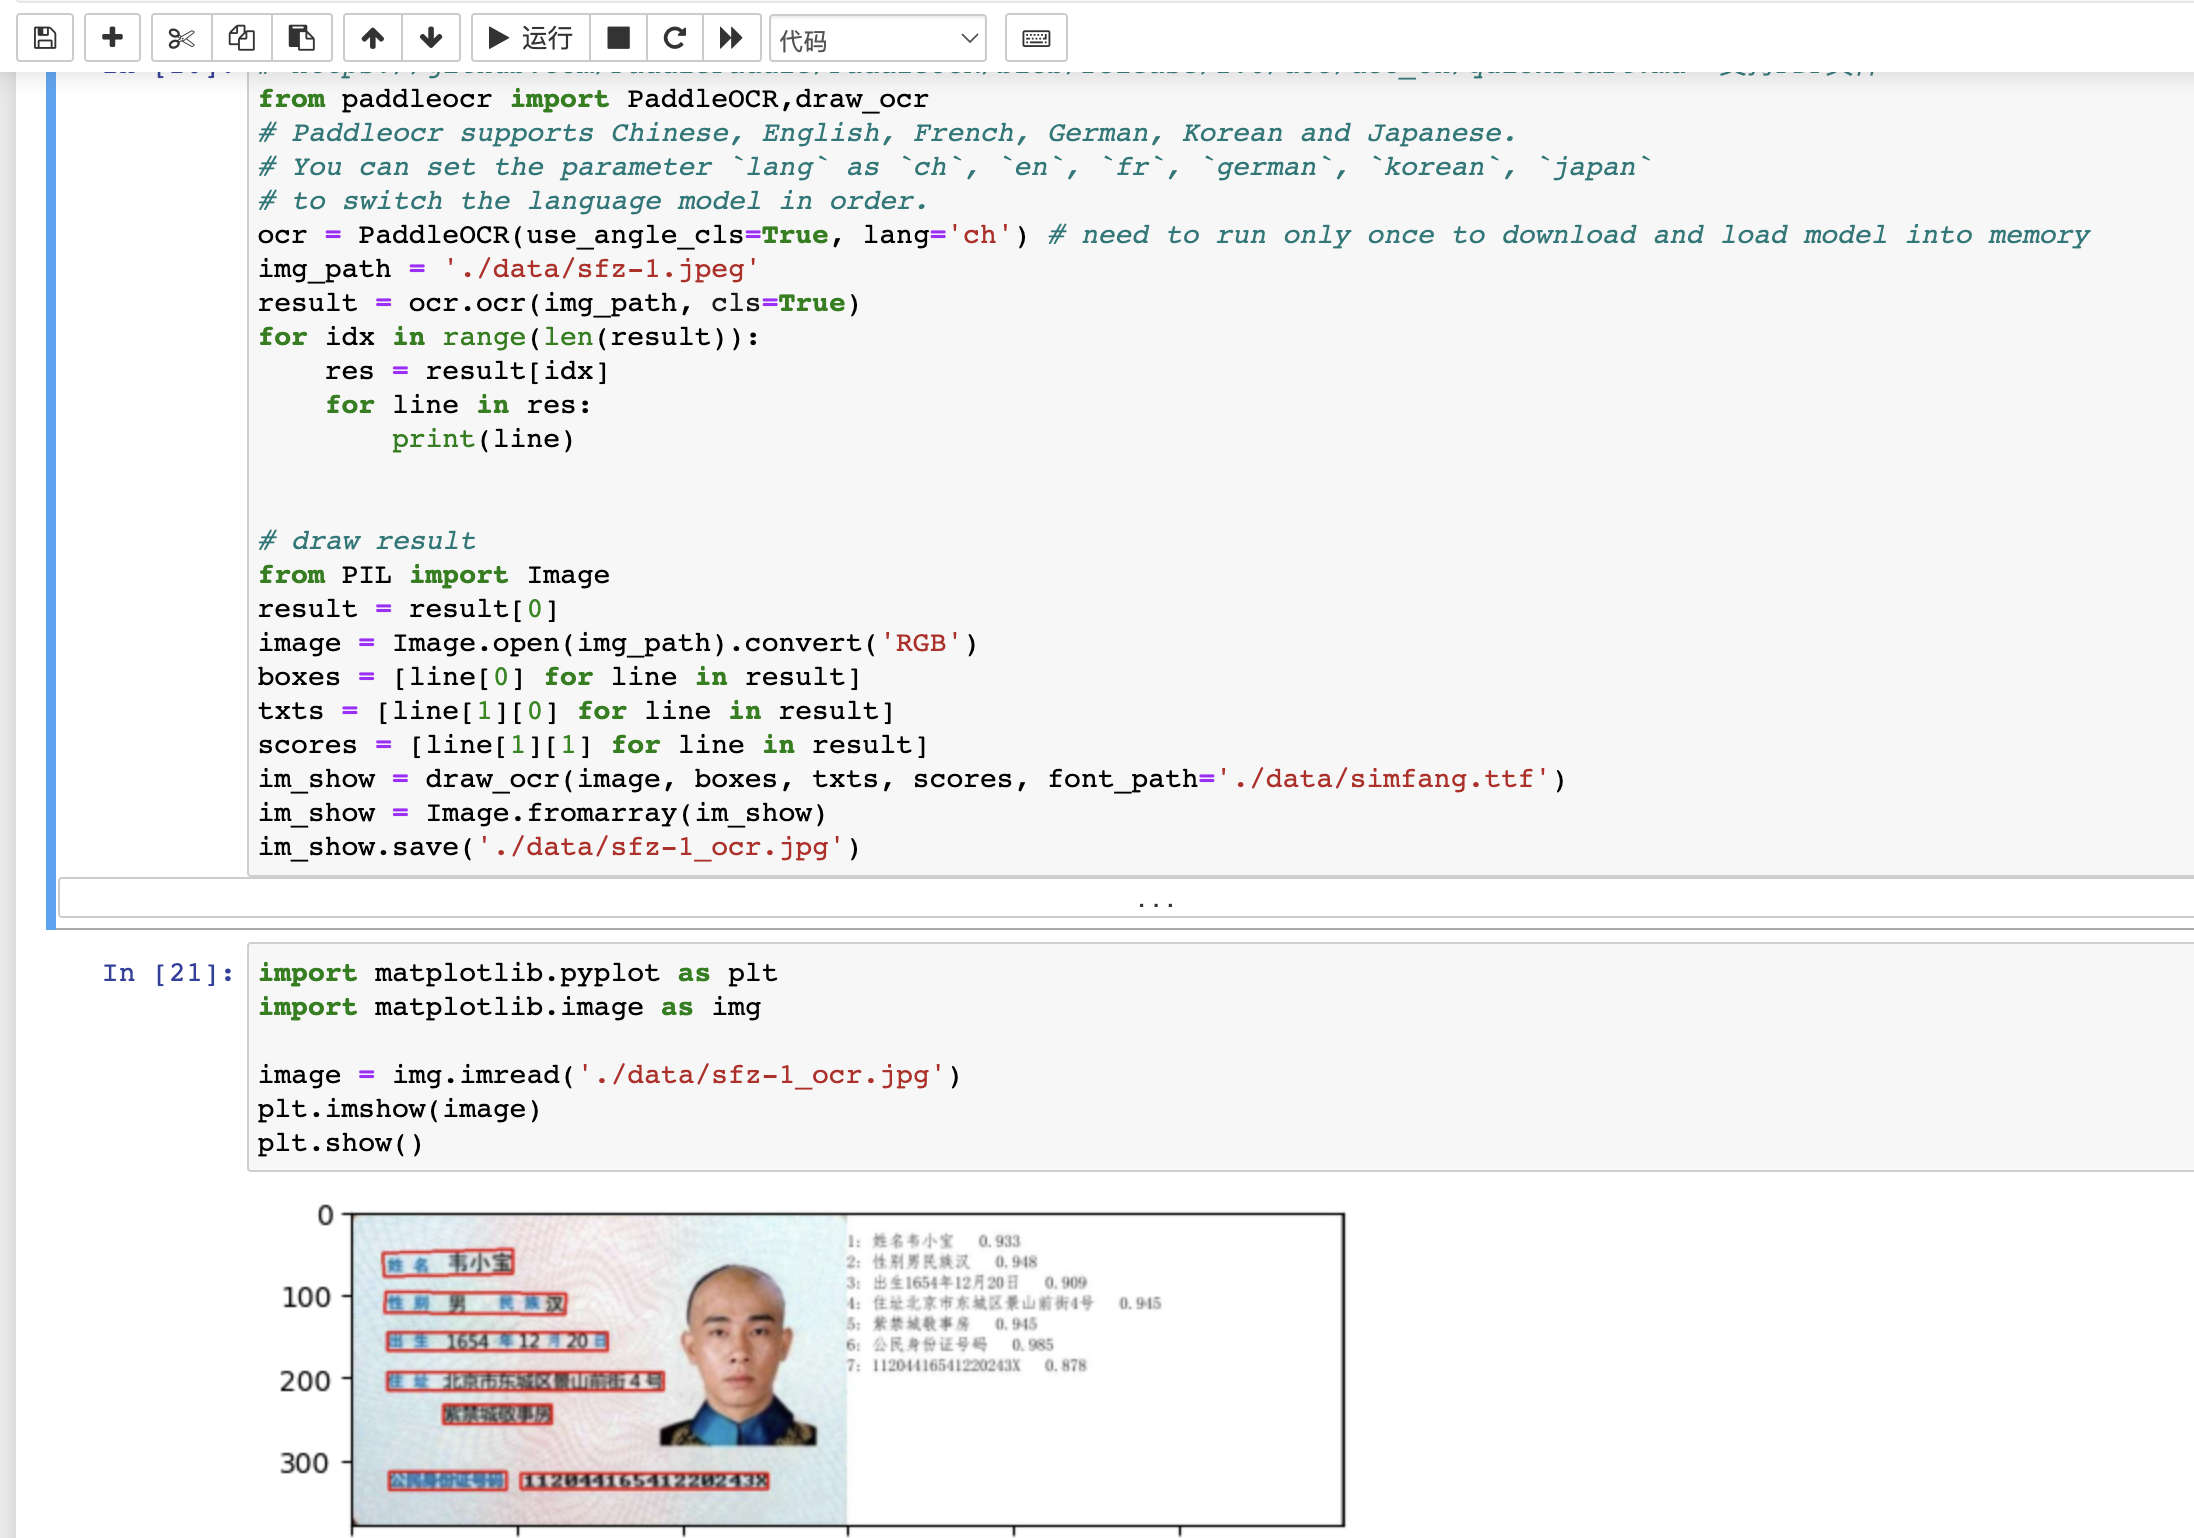
1. 图片信息识别-paddlepaddle 飞桨 (paddlepaddle)是百度的机器学习社区,其中发布了许多开源组件和产品。
本文使用PaddleOCR来识别身份证:
1 2 3 4 5 6 7 8 9 10 11 12 13 14 15 16 17 18 19 20 21 22 23 24 25 26 27 28 29 30 from paddleocr import PaddleOCR,draw_ocrocr = PaddleOCR(use_angle_cls=True , lang='ch' ) img_path = './data/sfz-1.jpeg' result = ocr.ocr(img_path, cls=True ) for idx in range(len(result)): res = result[idx] for line in res: print(line) from PIL import Imageresult = result[0 ] image = Image.open(img_path).convert('RGB' ) boxes = [line[0 ] for line in result] txts = [line[1 ][0 ] for line in result] scores = [line[1 ][1 ] for line in result] im_show = draw_ocr(image, boxes, txts, scores, font_path='./data/simfang.ttf' ) im_show = Image.fromarray(im_show) im_show.save('./data/sfz-1_ocr.jpg' ) import matplotlib.pyplot as pltimport matplotlib.image as img image = img.imread('./data/sfz-1_ocr.jpg' ) plt.imshow(image) plt.show()
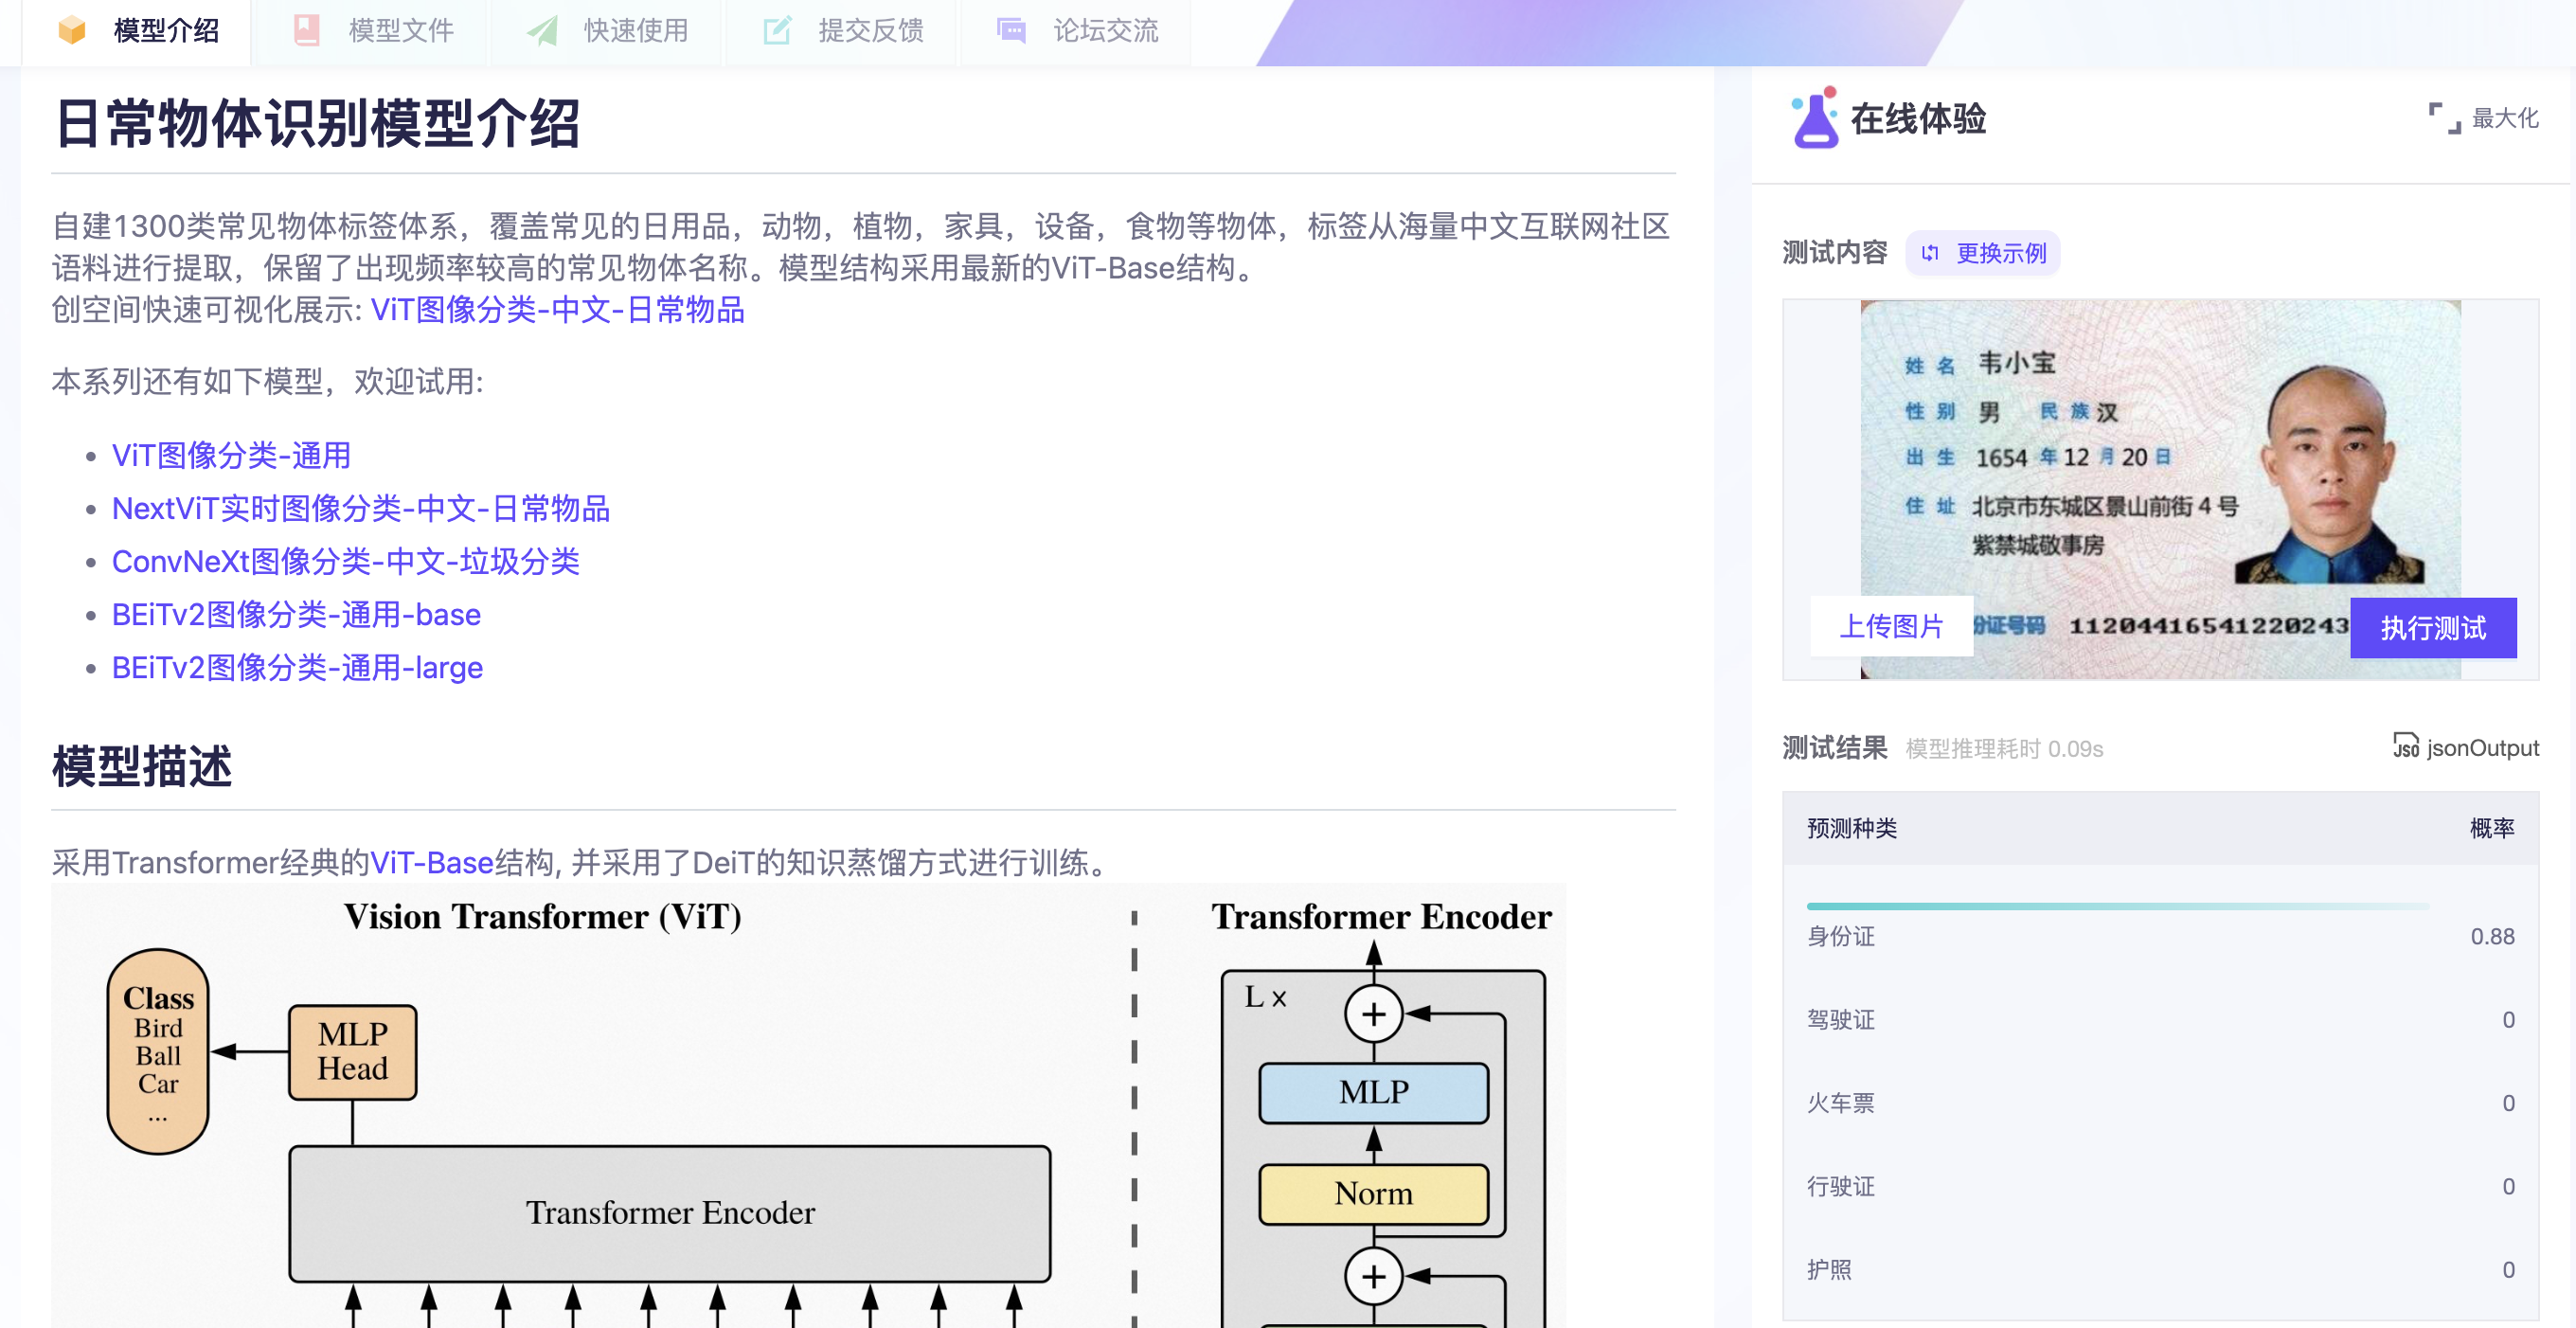
2. 分类通用图片-modelscope 魔搭 (modelscope)是阿里的机器学习社区,其中发布了大量模型。
本文使用“ViT图像分类-中文-日常物品” 模型来识别身份证,社区还提供了微调训练的方法。
3. ChatGLM - huggingface
Hugging face 起初是一家总部位于纽约的聊天机器人初创服务商,他们本来打算创业做聊天机器人,然后在github上开源了一个Transformers库,虽然聊天机器人业务没搞起来,但是他们的这个库在机器学习社区迅速大火起来。
目前已经共享了超100,000个预训练模型,10,000个数据集,变成了机器学习界的github。
国内开源可微调的模型chatglm-6b ,就发布在huggingface社区。国外AI大厂Google、Meta、OpenAI、Microsoft等都在上面发布模型,可以经常去使用学习。
0x05 ChatGPT类大模型 1. ChatGPT ChatGPT大模型引爆了AI行业,安全行业微软推出了Microsoft Security Copilot 。国内各大厂商也推出了大模型产品。
安全行业,目前看相关功能有:安全知识智能回复、协助分析安全事件并给出判断、快速写报告等。
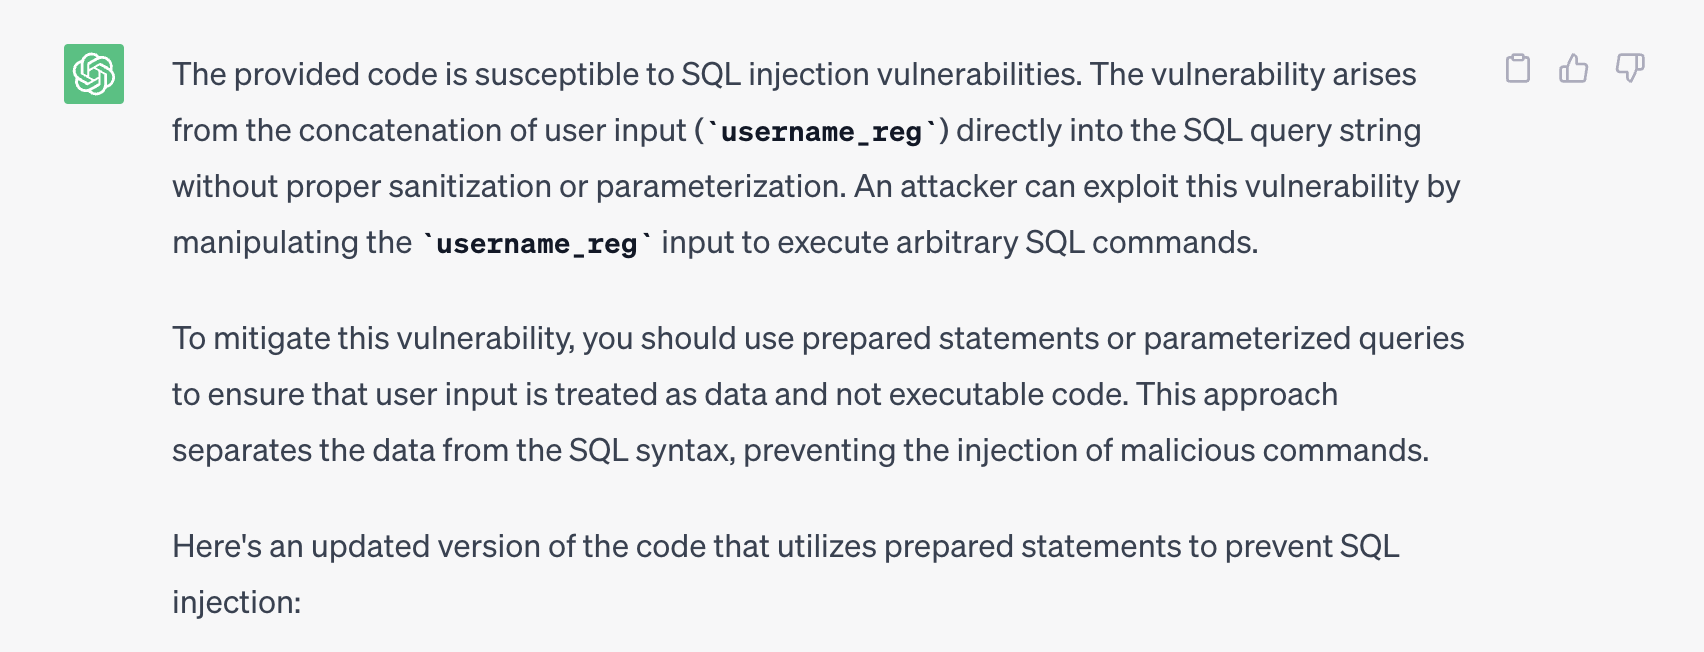
本文简单让ChatGPT协助进行代码审计:
1 2 3 4 5 6 7 8 9 10 11 12 13 14 15 16 17 18 19 20 21 22 23 24 25 26 27 28 29 30 31 32 33 34 35 36 37 38 39 40 41 42 43 44 45 46 47 48 49 50 51 52 53 54 You are now a security professional. The following code starts with a line of #, please help to judge whether there is a vulnerability in the code, and give the verified payload ############################################### @PutMapping ("/SqlInjectionAdvanced/challenge" ) @ResponseBody public AttackResult registerNewUser ( @RequestParam String username_reg, @RequestParam String email_reg, @RequestParam String password_reg) throws Exception { AttackResult attackResult = checkArguments(username_reg, email_reg, password_reg); if (attackResult == null ) { try (Connection connection = dataSource.getConnection()) { String checkUserQuery = "select userid from sql_challenge_users where userid = '" + username_reg + "'" ; Statement statement = connection.createStatement(); ResultSet resultSet = statement.executeQuery(checkUserQuery); if (resultSet.next()) { if (username_reg.contains("tom'" )) { attackResult = success(this ).feedback("user.exists" ).build(); } else { attackResult = failed(this ).feedback("user.exists" ).feedbackArgs(username_reg).build(); } } else { PreparedStatement preparedStatement = connection.prepareStatement("INSERT INTO sql_challenge_users VALUES (?, ?, ?)" ); preparedStatement.setString(1 , username_reg); preparedStatement.setString(2 , email_reg); preparedStatement.setString(3 , password_reg); preparedStatement.execute(); attackResult = success(this ).feedback("user.created" ).feedbackArgs(username_reg).build(); } } catch (SQLException e) { attackResult = failed(this ).output("Something went wrong" ).build(); } } return attackResult; } private AttackResult checkArguments (String username_reg, String email_reg, String password_reg) if (StringUtils.isEmpty(username_reg) || StringUtils.isEmpty(email_reg) || StringUtils.isEmpty(password_reg)) { return failed(this ).feedback("input.invalid" ).build(); } if (username_reg.length() > 250 || email_reg.length() > 30 || password_reg.length() > 30 ) { return failed(this ).feedback("input.invalid" ).build(); } return null ; }
ChatGPT可以准确判断出存在SQL注入漏洞。
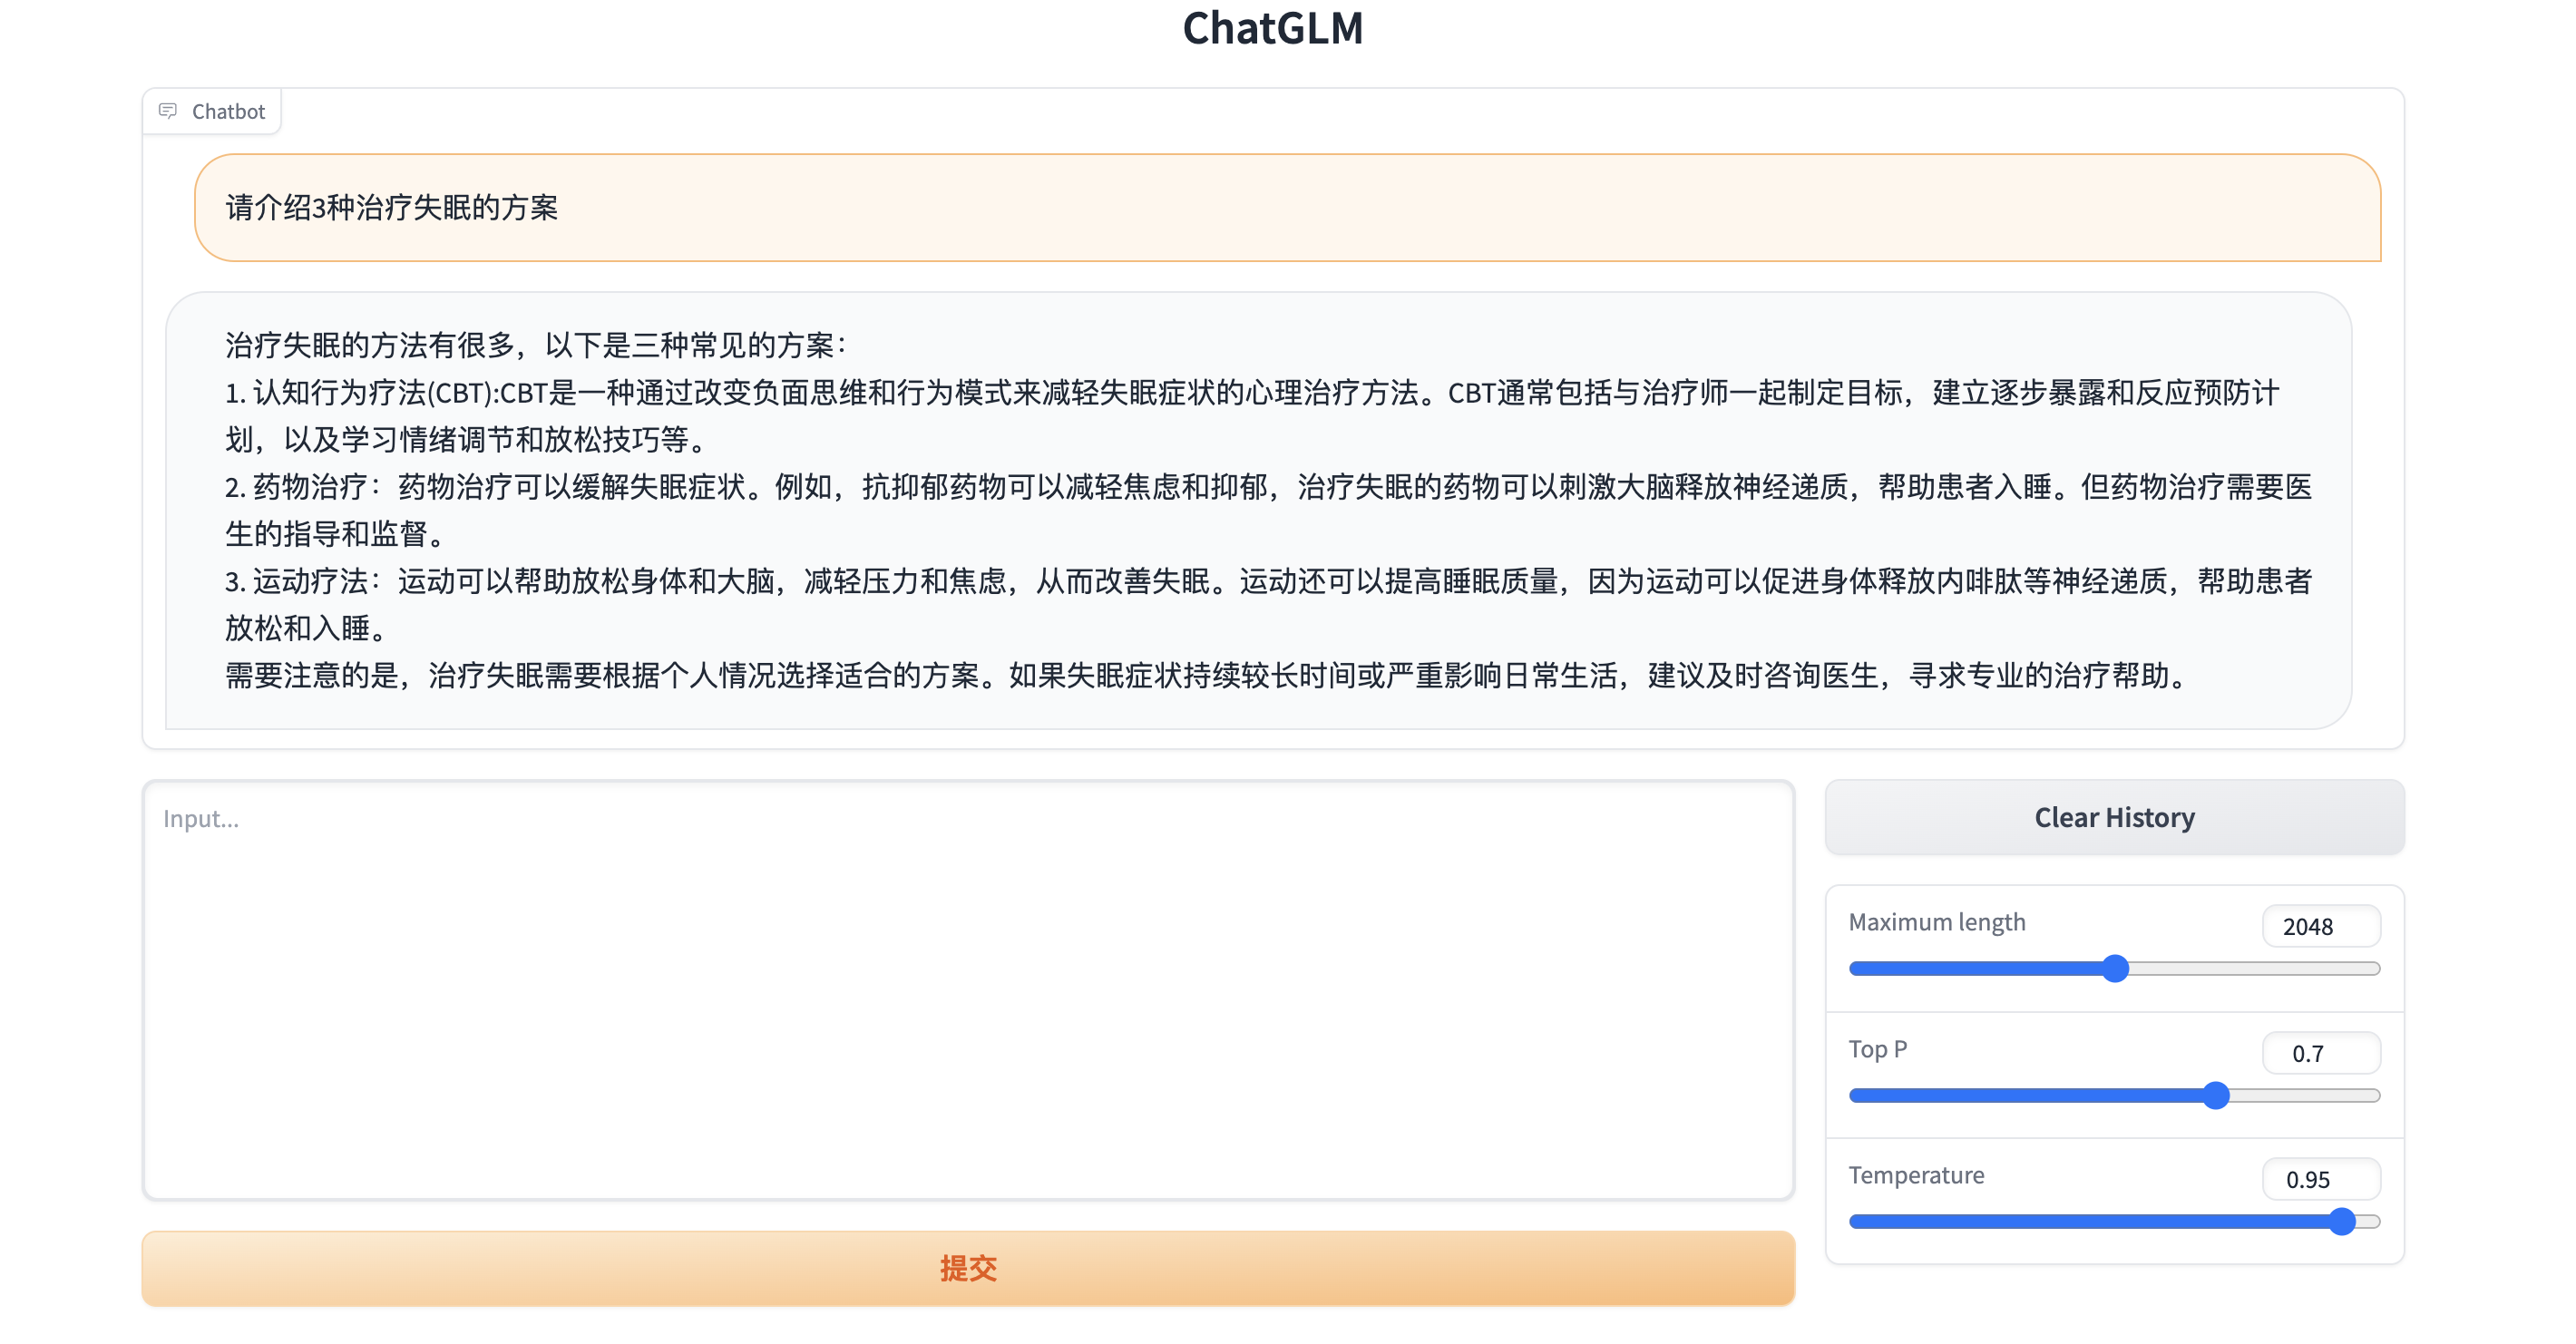
2. ChatGLM
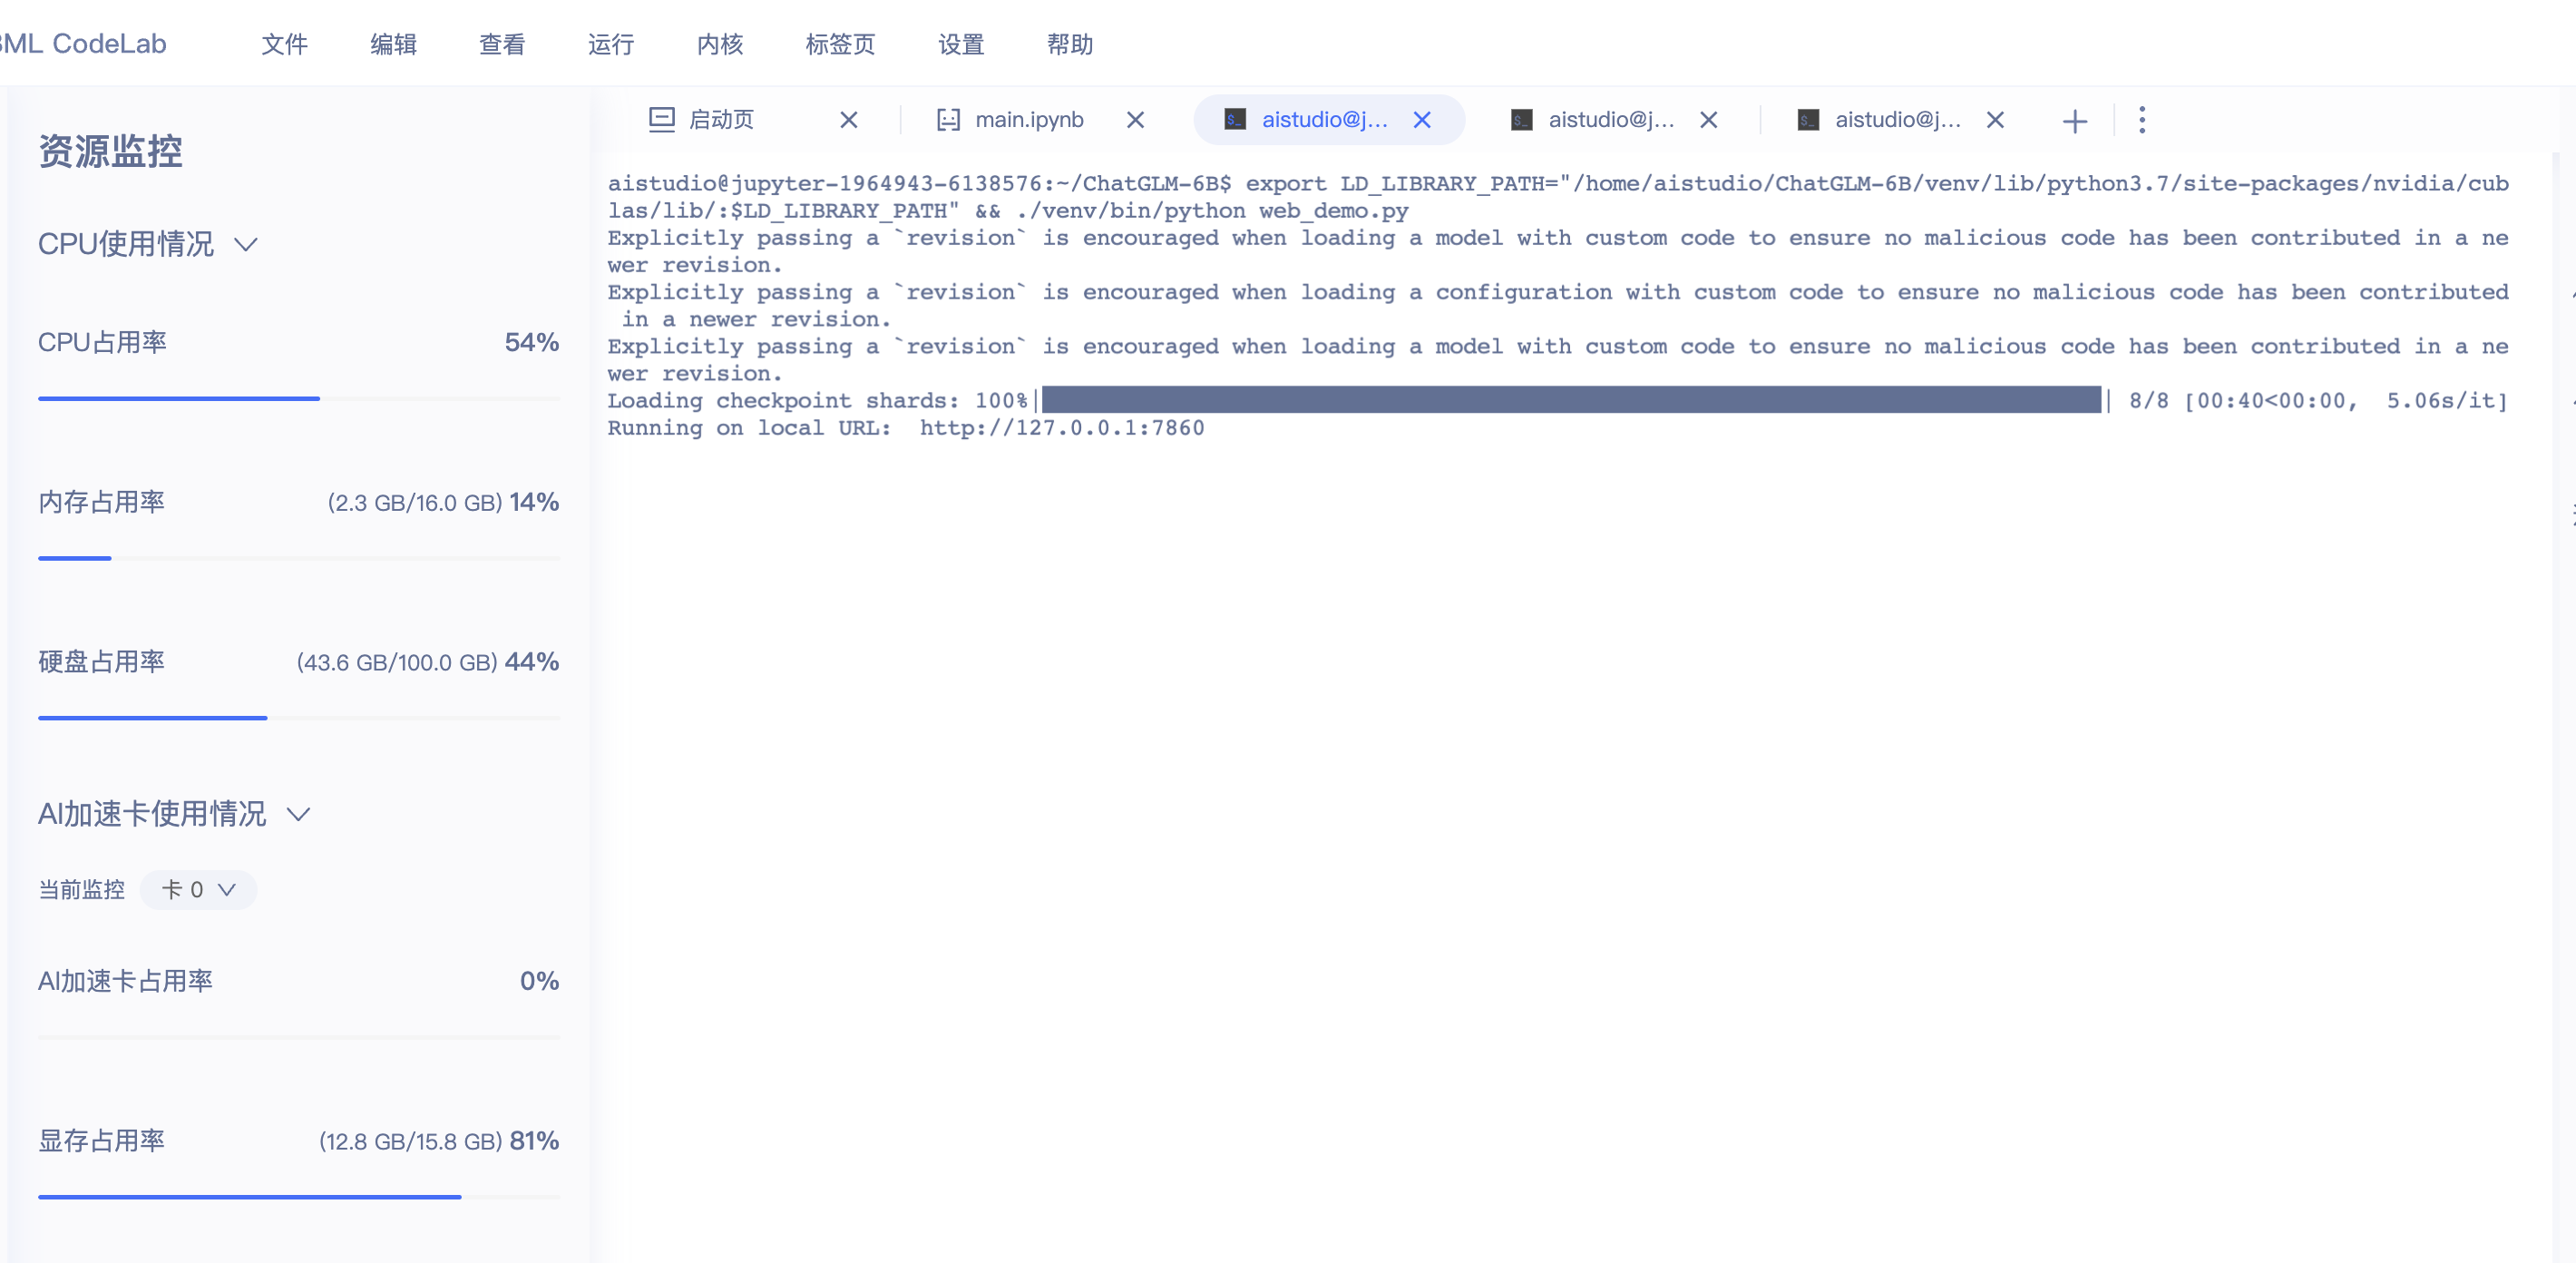
ChatGLM-6B 是一个开源的、支持中英双语的对话语言模型,基于 General Language Model (GLM) 架构,具有 62 亿参数。结合模型量化技术,用户可以在消费级的显卡上进行本地部署(INT4 量化级别下最低只需 6GB 显存)。
1
2
3
4
5
6
7
8
9
10
import requestsurl='https://cloud.tsinghua.edu.cn/d/fb9f16d6dc8f482596c2/files/?p=%2Fice_text.model&dl=1' save_path='/home/aistudio/chatglm-model-data/ice_text.model' headers = {'User-Agent' : 'Mozilla/5.0 (Windows NT 10.0; Win64; x64) AppleWebKit/537.36 (KHTML, like Gecko) Chrome/86.0.4240.198 Safari/537.36' } res = requests.get(url,headers=headers) file1 =open(save_path,'wb' ) file1.write(res.content) file1.close()
1
2
3
4
5
6
7
%cd ChatGLM-6 B !export LD_LIBRARY_PATH="/home/aistudio/ChatGLM-6B/venv/lib/python3.7/site-packages/nvidia/cublas/lib/:$LD_LIBRARY_PATH" && ./venv/bin/python web_demo.py
部署效果
0x06 未完待续 本文简单聊了下数据算法在日常安全运营工作中应用的几个场景和工具。后续持续更新。
各厂商都在降低算法使用的成本,使AI平民化。希望以后在日常安全工作中,发挥奇思妙想,使算法能得到更多更好的应用。